|
|
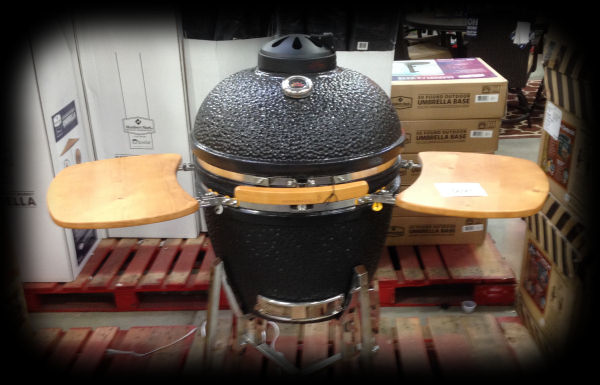
Photo Tour of the Vision Grills Classic B Cooker
Now let's take a close up look at some of the features and components that make up this cooker:
The Cart
The cart is made from stainless steel and comes requiring some simple assembly. Below you can see the overall cart in the first photo on the left. The cart has four casters, two of which are locking as you see in the next photo. Finally, in the last photo, you see one of the welds on the upright which hold it together. They aren't terribly pretty but they look quite sturdy.
The photo on the left below shows the center junction where the four pieces that make up the cart are joined on the bottom level. There is another junction like this higher up that forms the support for the cooker. You can see that (looking straight up) in the photo on the right. That center square piece has tabs that slide into the four supports and are held together with eight screws.
The Upper Vent
Next, let's move on to the upper vent. This may be hard to explain, but we'll try. Those "petals" you see in the first photo stay open. The sliding top part rests on a plate that has matching petal-shaped openings. When you rotate the top, you are controlling airflow by controlling how much of the top openings overlap with the bottom openings. As you can see in the third photo, the top vent has markings that allow you to more accurately repeat vent settings from cook to cook. (There are also markings on the bottom vent as we shall see later.)
It should also be obvious from the middle photo that you really need to use a cover on this cooker since rain will enter the top and collect inside those petals if you leave it uncovered. The cooker does come with a cover, so it would be best to use it as much as possible.
The top is held on to the cooker with spring clips and the "chimney" has gasket material to help with a tight seal.
Materials Used To Construct The Cooker
Now for a look at the materials used to construct the cooker itself. Vision Grills describes the material they use for the body of the cooker as "heavy duty ceramic." It is covered with a black ceramic glaze. As you can see from the photo below on the right, the glaze exhibits crazing, a perfectly normal attribute of ceramic glazes. (One manufacturer who happens to use something other than a ceramic glaze for their cookers likes to point out the crazing on competitors' cookers as if it is a defect. Again, it is normal.) The outer surface is the typical dimpled surface that you see on so many kamado-style cookers.
The Thermometer
As for the thermometer, it has a relatively small dial that is marked off from 100° F to 700° F. (The glass in the thermometer is about 1¾ inches in diamter.) The dial also has four ranges marked, "warm", "smoke", "grill"and "sear". It is held in place in the cooker lid with a wingnut.
Inside The Cooker
The inside of the cooker contains no real surprises. However, there are a few differences from other cookers we have seen. First of all, there is no fire ring. The fire box is taller than usual and serves the dual role of fire box and fire ring. This is not a problem. However, some people like to remove the fire ring from their cooker in order to place a grate closer to the fire for searing purposes.
Another slightly odd thing is that the fire grate rests on a horizontal ledge in the firebox which is about four inches above the bottom of the cooker. As you can see in the photo at right, the outer ring of holes in the fire grate are blocked by the ledge and thus pass no air through them. The red circle shows where the edge of the ledge is and all the holes outside the circle are not used. Mike, who allowed us to use his cooker for our temperature testing, indicated that some owners have had trouble with poor airflow and have thus use three bolts as legs on the fire grate in order to raise it up about ½ above the ledge to allow more air to flow through the fire.
The hole in the bottom of the fire box is 8⅜ inches in diameter, while the diameter of the fire grate is 11¼ inches. The holes in the fire grate are ¾ inches in diameter.
Finally, you can see the gap cut into the side of the firebox to help resist cracking and breaking. The slot goes down to the ledge of the firebox and stops there. The firebox also contains the usual holes in the sides to allow some airflow into the fire from the side, in this case, seven holes.
Also notice in the photo on the left how large a gap is left between the firebox and the cooker walls. The outside diameter of the firebox is 18-1/8 inches, while the inside diameter of the cooker at that point is 20-3/8 inches, leaving a gap of about 1-1/8 inches all the way around. If you find that your cooker won't get to steak-searing temperatures, it may be that air is coming up the outside of the firebox rather than coming up through the fire itself. People have found this to be true on certain sizes of Big Green Eggs. You may wish to block that gap with aluminum foil in order to force the air to travel up through the fire. (We'll also see later that the small firebox causes the cooking grid to overlap the top of the firebox, so your heated cooking surface is quite a bit smaller than might be possible if the firebox were larger.)
The Cooking Grid
Next let us look at the cooking grids. The lower grid is made from 3/16" stainless steel rod and is 19-3/8 inches in diameter, or about 295 square inches of grid space. The upper grid is made from 1/8" stainless steel rod and is 18-5/8 inches in diameter, or about 272 square inches. This gives you a total of 567 square inches of cooking space between them. (Their web site says you get 602 square inches, but we only measured 567 square inches.)
The lower grid has handles at the front and the back of the grid to help with removing it from the cooker, but requiring you to reach over the fire if you want to remove the grid while you have a fire going. As you can see in the photo at right, the upper grid sits on the lower grid using four vertical rods. The distance between grids is about 3¾ inches.
The 295 square inches for the bottom grid is technically correct, however, if you look at how the lower grid sits on top of the firebox, you'll see that the lower grid is quite a bit larger than the firebox. The inside diameter of the firebox at the top is only 16¼ inches which yields 207 square inches of fire exposure. Thus only 207 of your 295 square inches on the lower grid, or about 70% of the grid, are actually directly exposed to the fire. The remaining 30% of the grid is sitting on the firebox wall or overhanging the space outside the firebox.
The next two photos below show the "feet" that rest on the lower grid and support the upper grid. The "feet" that rest at the back of the grid hook into the rods of the lower grid. The "feet" that rest towards the center of the grid just sit on a pair of rods on the lower grid. We must say this is the most awkward raised grid configuration we have come across so far. In order to hook those rear feet into the lower grid, you must tilt the upper grid at quite a severe angle. So you cannot remove or install the upper grid with food resting on it as you might during a cook, and you also cannot remove or install the upper grid without removing the lower grid from the cooker. You simply cannot tilt the upper grid far enough to hook the rear fit on the lower grid while it is in the cooker.
Below you can see the grids out of the cooker again. Both the lower and upper grids have hinged portions to allow access below each grid. The upper grid is hinged in the middle of the grid, so half the grid swings up and half the grid remains horizontal. A smaller portion of the lower grid is hinged, about 5¼ of the grid raises up in the front. The front-most two rods on the bottom grid are fixed and do not swing up.
The Gasket
The gasket is a felt-like material. There's not much we can say about the gasket itself as we obviously won't have the opportunity to cook on the cooker. The
gasket appears to have been installed at the factory since there is nothing in the assembly instructions about installing it. The installation was a bit sloppy in that they failed to line the gasket up with the rim all the way around the cooker.
The Hinge and Bands
Now let's move on to the hinge and bands. The hinge frame is made from 3/32" stainless steel. It isn't all that substantial and if you hold the handle on the dome and move the dome from side to side, it moves more than any of our other cookers. The hinges on our other cookers are made from thicker material. For example, a comparably sized large Big Green Egg is made from 3/16" metall, or twice the thickness of this grill. Our Kamado Joe BigJoe hinge is made from 1/4" metal. Even our small Big Green Egg which has only a 13" grid has a hinge made from 1/8" thick metal and there is no side to side movement when you try to wiggle it. We imagine the hinge on this grill is adequate but it doesn't give you a good feeling when you can wobble it side to side.
As you can see in the photo in the center below, the hinge bands are recessed into a groove in the dome, so there should be no problems with domes popping out of the bands. Of course, the bands, the base and the dome come preassembled, so they should line up and the dome should close to an airtight seal. The model in the store did indeed appear to have the dome and base lined up quite accurately. However, as you can see from the photo on the right, the lower band wasn't tight. You can see the lock washer has not been compressed, so this looks like the nut is only finger tight. The assembly instructions don't explicitly instruct you to tighten these bolts as a part of assembly, but rather advises you to check them routinely under "Long-Term Maintenance." More on this later....
The Handle and Side Tables
Next, let's take a look at the handle. It is made from wood and is attached to the upper band with two stainless steel brackets. It is approximately 12 inches wide.
And now for the side tables. The side tables appear to be made from pine. They are approximately 19½ by 12½ inches. The tables fold up and can then be held in the up position.
The Lower Vent
The lower vent can be seen below. The photo on the left shows the two-piece construction. The inner slider is a spark screen and contains a scale to help you replicate the setting of the lower vent. The outer slider is the solid piece that controls the air flow. The lower vent, meaning the opening in the ceramic base, is approximately 3½ inches wide by 2⅝ inches high.
The fit of the two sliding pieces that cover the lower opening is quite loose and they don't come close to sealing off the bottom opening. You can see in the photo below on the right how Mike had to jam some material in to hold the sliders in place firmly enough to get a good seal when using a Stoker temperature controller. You should be sure to completely close the top vent when shutting down the cooker, and you may need to take the leaky lower vent into consideration when doing low and slow cooking. Also, they are loose enough to move freely, so be careful not to bump them once you have set your vent opening. The second photo from the left shows the lower vent opening with the sliders open all the way.
The Ceramic Glaze Finish
We examined the outside surface of the cooker for damage. We found two very small chips in the glaze, about the size of a very small pea. There were four blemishes in the glaze around the rim of the base. We have no way of knowing, of course, if any of this was done by the store personnel who assembled the cooker or if the damage was done in transit. We weren't bothered by any of it. One of the small chips was on the front of the cooker and maybe it might annoy someone who is very particular, but overall, the cooker's finish was in quite good shape.
The Shock Absorber
And then there is this curious little cylinder on the front of the cooker which resembles a miniature Thermos flask. This is the shock absorber. The shock absorber is attached to the base, while there is a cap that is attached to the lid. When you close the lid, the cap settles down on the spring-loaded button on top of the shock absorber and cushions the closing of the lid.
We've owned seven kamado-style cookers and frankly, we have never felt that there was a need for a device like this. In opening and closing the lid of this cooker, we never found a need for any shock absorber. We also can't recall any stories over the years of damage being done by people dropping their lids. On the other hand, the shock absorber has the potential of getting in the way. For example, if you are putting a pizza into the cooker, you'll have to hold your peel at more of angle to clear the shock absorber. Also, the shock absorber also appears to have the potential for keeping the lid from closing tightly. The cooker in the store appeared to have a seal, but you could see that if you pressed down on the handle, the lid would close just a bit more. If the gasket compresses over time, you may find yourself having to press down on the lid to get an airtight seal. We think if we bought one of these cookers, we'd remove the shock absorber and cap.
You can support this website by shopping at The Naked Whiz Website Store and Amazon.com
|