|
|
Guided Cooking Process
The MEATER system is more than just the probes. You also need the MEATER app which is free for iPhone and Android devices. While
the MEATER app does the obvious task of showing you the current temperatures being measured by the probe, it also has a feature called
"Smart Guided Cook" where you tell the app what you are cooking and it will guide you through
the process. (You can also set up custom cooks tailored to your own specific needs.) To test this process and
demonstrate it to you for this review, we cooked a couple of pieces of meat using the MEATER guided cooking process.
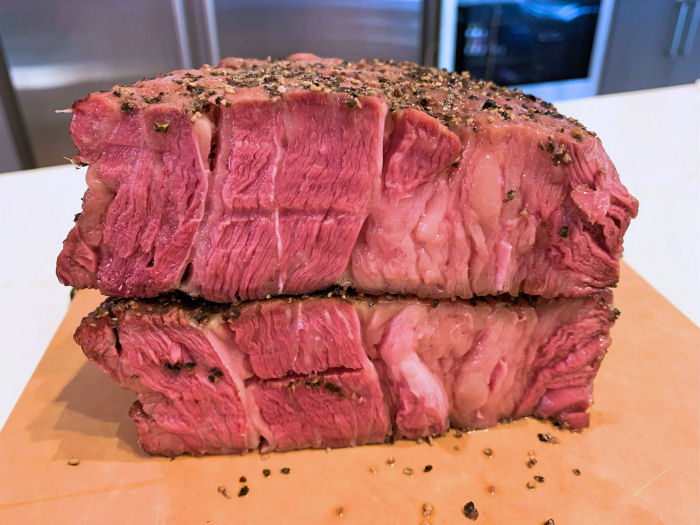
Chuck Steak: The first piece of meat that we cooked using this guided cooking process was a 2" thick chuck steak:
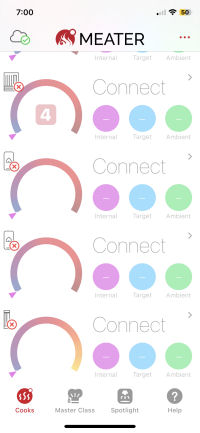 When you first start the App and the MEATER probe is still in the charger, you get this screen with the probe information dimmed. |
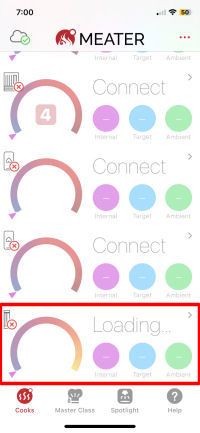 When you remove the probe from the charging base, it turns on and now the probe says "Loading..." |
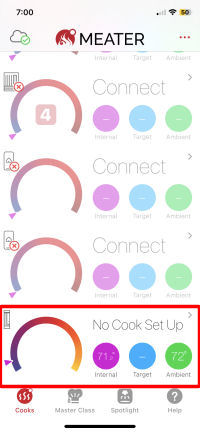 After a second or two, the entry for the probe brightens up and says "No Cook Set Up". Tap on the probe entry to set up a cook. |
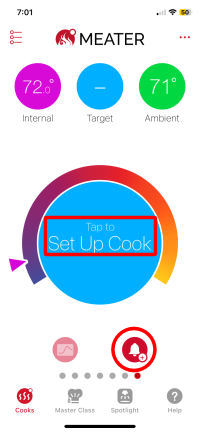 Here you can either tap on the bell to set up alarms, or tap on the blue circle to set up your cook. |
 Since we are cooking a beef chuck steak, we tapped "Beef". |
 The MEATER App doesn't have chuck steak, so we chose "Roast" instead. |
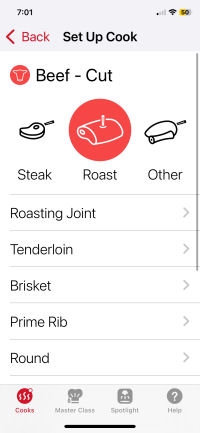 We had to scroll down to find the chuck roast. |
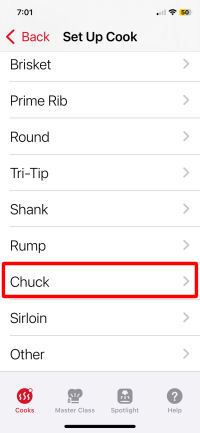 We found it down below and tapped on "Chuck". |
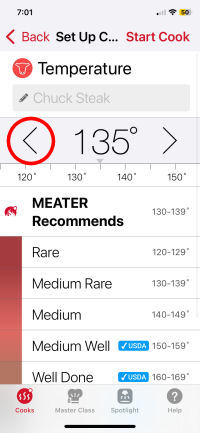 Here you can either select your target temperature from a list, or tap the left/right arrows to adjust the value shown. We tapped to left arrow to lower the value. |
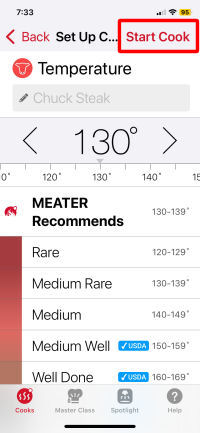 We chose 130°F then tapped "Start Cook" to start the cooking process. |
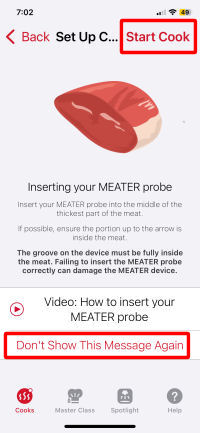 You are presented with some helpful information on inserting the probe. You can tap on "Don't Show This Message Again" to get rid of it on subsequent cooks. Tap on "Start Cook". |
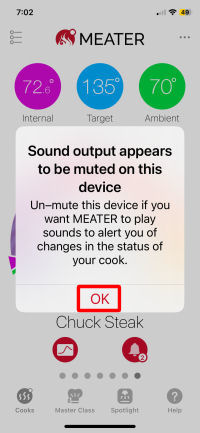 We had sound turned off on our phone, so the App gave us a warning. Tap "OK". |
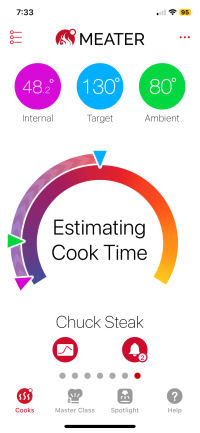 The App will now start estimating the time remaining. The estimate won't appear until the meat temperature has risen at least 10°F. |
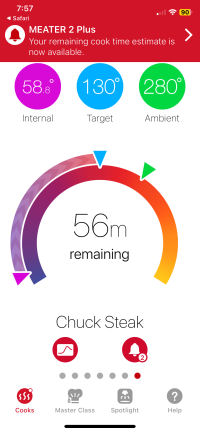 When the first "Time Remaining" value is available, you will get the red notification block at the top of the screen. The App will count down the time remaining until it determines there are 5 minutes left. |
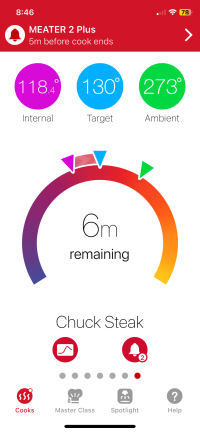 When there are 5 minutes remaining, you will get another red notification block at the top of the screen. (Well, they were close, LOL!) |
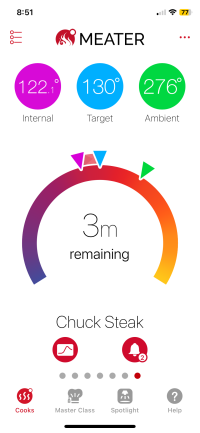 Three minutes remaining! |
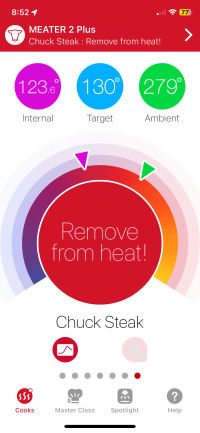 When time remaining hits 0, the App will tell you to remove the meat from the heat. |
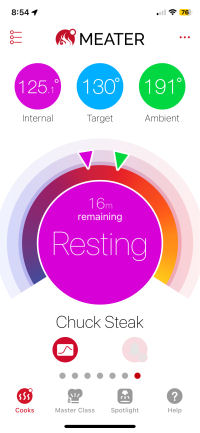 Now the resting portion of the cook begins. The App will start counting down the estimated time remaining to rest the meat. |
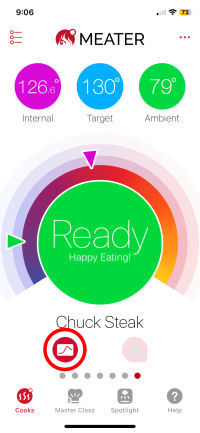 Once the App determines that the resting period is over, it will signal the your cook is complete. One last thing, at any time during the cook you can tap on the graph icon to see a graph of your cook. |
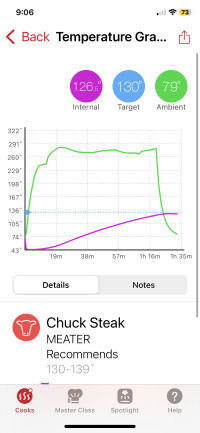 The graph shows you a plot of the ambient temperature and the internal food temperature. |
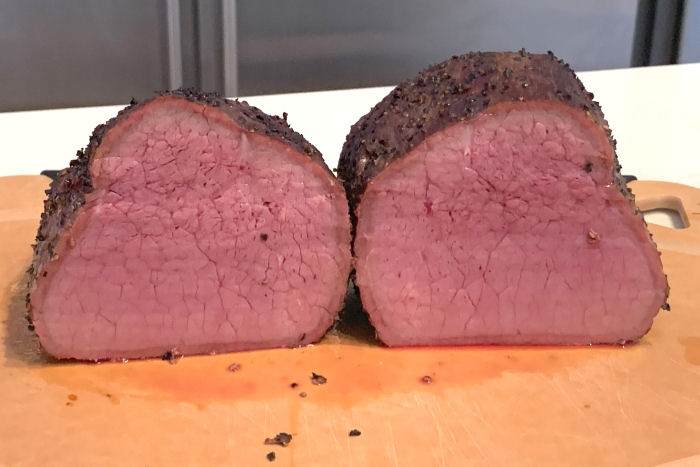
So how did the chuck steak turn out? Well, the meat turned out pretty close to what we expected, as you can see. Getting the temperature right and properly resting the meat is very important. However, our target temperature was 130°F but the meat only reached 126.5°F after resting. (And considering the error we found when testing the probe in boiling water, it may have actually only been 125°F.) With experience, you may find you want to select your target temperature keeping in mind that the probe's readings may be slightly off and the App may miss by a few degrees on the resting process.
Beef Eye of Round: The second piece of meat we cooked was a beef eye of round. In light of our experience with the chuck steak, we decided to select a target temperature of 135°F. This time, the App got the final temperature of the meat just right (albeit the probes are about 2.0°F high) and when the meat finished resting, the final internal temperature of the eye of round was 134.9°F according to the probe's reading.
Predicting Time Remaining and Rest Time
Another feature of the MEATER app which can be useful is its ability to provide an estimate of when the meat will be done and when the resting period
will be done. We monitored these two predictions throughout the cook of the chuck steak and eye of round that we just showed you. Here's what we found:
Chuck Steak: So for this 79-minute cook, the App started out with a great estimate but then started giving less and less accurate forecasts until 37 minutes into the cook. But with 20 minutes to go in the cook, the error in its prediction was 3 minutes or less. So all in all, not bad. Not as good as the 8-sensor Combustion Predictive Thermometer, but still reasonable.
| Elapsed Time | Predicted Time Remaining | Predicted Finish Time | Actual Finish Time | Error |
|---|---|---|---|---|
| 0:00 | Cook Start | n/a | 1:19 | n/a |
| 0:24 | 0:56 | 1:20 | 1:19 | +0:01 |
| 0:27 | 0:48 | 1:15 | 1:19 | -0:04 |
| 0:32 | 0:38 | 1:10 | 1:19 | -0:09 |
| 0:37 | 0:34 | 1:11 | 1:19 | -0:08 |
| 0:42 | 0:30 | 1:12 | 1:19 | -0:07 |
| 0:47 | 0:25 | 1:12 | 1:19 | -0:07 |
| 0:52 | 0:22 | 1:14 | 1:19 | -0:05 |
| 0:57 | 0:19 | 1:16 | 1:19 | -0:03 |
| 1:02 | 0:14 | 1:16 | 1:19 | -0:03 |
| 1:07 | 0:10 | 1:17 | 1:19 | -0:02 |
| 1:12 | 0:06 | 1:18 | 1:19 | -0:01 |
| 1:17 | 0:03 | 1:20 | 1:19 | +0:01 |
| 1:19 | Cook Finished | 1:19 | 1:19 | +0:00 |
As for predicting rest time, the App's initial prediction was about 6 minutes too long. The last prediction was 8 more minutes and then 2 minutes after that, POOF!, the App said the meat was done resting. So it seems that the rest time algorithm wasn't all that accurate.
Eye of Round: We wondered if the MEATER App had trouble predicting the final rest time and temperature of the chuck steak because it was a flat cut of meat, versus a roast. That's why we picked the eye of round for the second cook.
So for this 94-minute cook, the App again started out with a great estimate but then started giving less and less accurate forecasts until 37 minutes into the cook. At that point, it slowly started to improve its estimate, but wasn't really very accurate until (again) about 20 minutes to go in the cook, when the error in its prediction was 3 minutes or less. So all in all, not bad. But again, not as good as the 8-sensor Combustion Predictive Thermometer.
| Elapsed Time | Predicted Time Remaining | Predicted Finish Time | Actual Finish Time | Error |
|---|---|---|---|---|
| 0:00 | Cook Start | n/a | 1:34 | n/a |
| 0:25 | 1:08 | 1:33 | 1:34 | -0:01 |
| 0:31 | 0:50 | 1:21 | 1:34 | -0:13 |
| 0:36 | 0:42 | 1:18 | 1:34 | -0:16 |
| 0:41 | 0:37 | 1:18 | 1:34 | -0:16 |
| 0:46 | 0:33 | 1:19 | 1:34 | -0:15 |
| 0:51 | 0:29 | 1:20 | 1:34 | -0:14 |
| 0:57 | 0:27 | 1:24 | 1:34 | -0:10 |
| 1:02 | 0:24 | 1:26 | 1:34 | -0:08 |
| 1:05 | 0:21 | 1:26 | 1:34 | -0:08 |
| 1:12 | 0:18 | 1:31 | 1:34 | -0:03 |
| 1:17 | 0:14 | 1:31 | 1:34 | -0:03 |
| 1:22 | 0:11 | 1:33 | 1:34 | -0:01 |
| 1:27 | 0:07 | 1:34 | 1:34 | +0:00 |
| 1:32 | 0:03 | 1:35 | 1:34 | +0:01 |
| 1:34 | Cook Finished | 1:34 | 1:34 | +0:00 |
As for predicting rest time, this time the App's initial prediction was spot on at 17 minutes. All throughout the rest, the prediction remained the same.
So the bottom line for predicting cook time and rest time was the App did a fairly good job of predicting when it was going to declare the cook to be over. However, with the chuck steak the App declared the cook over too soon and thus the meat never reached our target temp when it was removed from the cooker and allowed to rest. On the other hand, with the eye of round the App predicted the cook time accurately enough that the rest allowed the meat to reach our desired target. So it looks like the App may do a better job with large roasts rather than flat cuts of meat.
In light of these mixed results, rather than rely on the MEATER App's predictions, you should monitor the temperature of the meat yourself and take it out of the cooker when you see that the internal temperature has risen enough that the carry over during the resting period will take the meat's internal temperature to your target. You can let the App be a rough guide, but you still need to use your own judgement.
| UPDATE: In light of how poorly the App did on getting the final internal temperature correct for the chuck steak, and how well it did for the eye of round, we decided to cook another chuck steak, but this time we told the App that we were cooking a sirloin steak rather than a chuck roast. In other words, we told the App that we were cooking a flat piece of meat, not a big cubical roast. Lo and behold, this time the App nailed it. We suspect the algorithm for predicting the cook time and rest time is taking into account the shape of the cut of meat. Which leads us to our next Nugget Alert. | |
 |
NUGGET ALERT: When setting up a cook and selecting the cut of meat, you may find that you get better results for cook time and rest time if you try to match the shape of the cut rather than the actual type of cut. |
Connectivity Information
There are three ways to access the data being recordd by the MEATER Probe: Bluetooth, MEATER Link and MEATER Cloud.
Bluetooth: We'll assume everyone knows what Bluetooth wireless communication is. The MEATER 2 Plus uses Bluetooth 5.2 All communications with the MEATER 2 Plus probe begin with Bluetooth. The probe must connect to the repeater/charger via Bluetooth and then the repeater/charger must connect via Bluetooth to your smart device running the MEATER App. The repeater/charger must remain within Bluetooth range of the probe and the smart device in order for the App to receive temperature data.Another change to the App is that formerly, each active probe had an icon that showed which of these three methods the probe was connected. This feature is now gone.MEATER Link: This method allows one smart device to connect to the MEATER 2 Plus charger/repeater via Bluetooth, but then allows a second smart device to connect to the first via a local wifi network. Both smart devices must be running the MEATER app and must be connected to the same local wifi network. In addition, MEATER Link must be enabled on both smart devices. If both devices are on the same wifi network, the remote device will automatically connect via MEATER Link. (The intent of this method was to allow you to connect the two smart devices without using cellular data.) If you take the remote device out of range of the wifi network, it will automatically switch over to the next method, MEATER Cloud.
NUGGET ALERT: Apparently on Android devices, there is no option to enable MEATER Link. We don't have one to play with so we don't know if MEATER Link is enabled by default or if Android doesn't support it.
MEATER Cloud: This method also allows one smart device to connect to the MEATER Probe via Bluetooth, but instead of using just wifi to connect a second smart device, the internet is used to connect the second smart device. Thus, you can monitor the MEATER Probe remotely on the second smart device as long as it is connected to the internet. This method requires both smart devices to be running the MEATER app and be connected to the internet. Both devices must have MEATER Link enabled. (In the older version of the App, you had to enable MEATER Cloud, but now it is enabled by virtue of you signing into the MEATER Cloud.
NUGGET ALERT: What all this connectivity stuff means is that if you have one smart device, you can only access your probe via a Bluetooth connection to the charger/repeater. However, if you have two smart devices, you can enable MEATER Link on both devices, leave one smart device by your cooker, then monitor your probe whereever you have internet access. The smart device you leave by the cooker acts as a Wi-Fi bridge from Bluetooth to the internet.
We should also mention, that someday, if MEATER does ship a MEATER 2 Block, you will have the option to remotely monitor your MEATER probe with only one smart device. You will be able to leave the MEATER 2 Block near your cooker which will connect to the MEATER Probe via Bluetooth (replacing the smart device that you have to leave next to your cooker) and to the network via wifi. Then you can use a smart device to connect to the MEATER Block via wifi or the internet.
And finally we will note that "direct pairing" of probes has been removed from the App. This feature allowed you to pair your probe with your smart device directly without using the charger/repeater. This could come in handy if, for example, in the middle of a cook the battery in your charger/repeater died and you didn't have a fresh AAA battery available. If you had direct pairing enabled, your probe would automatically pair directly with your smart device. You could then still bring your smart device into range of your probe and use the App. The downside of this was that if you ever did direct pair your probe to your smart device, you had to manually unpair it and repair it with the charger/repeater. Needless to say, many folks didn't know this feature was enabled and couldn't figure out why their Bluetooth range was suddenly reduced.
Usage Notes And Warnings
The MEATER website is filled with information about using your MEATER Probe. We have pulled out some of the more important-sounding
rules, limitations and warnings here:
|
NUGGET ALERT: Another consideration when inserting your probe is that with a slimmer shaft, it is more likely that the meat will push the probe out during the cook, possibly exposing too much of the probe to heat. It is best to insert the probe a little more than the minimum insertion line. |
MEATER 2 Plus probe constantly disconnecting and reconnecting: During our 79-minute cook of the chuck steak, we kept the charger/repeater next to our cooker. About 10 times during the cook for no apparent reason, the probe briefly disconnected for a few seconds and then reconnected. We encountered these quick disconnects during much of our testing, even when the phone, probe and repeater were all within a foot or two of each other. Surely this has to be a software issue that MEATER needs to resolve. It's as if the software is randomly resetting the Bluetooth radio, either in the probe or the repeater. MEATER 2 Plus probe temperatures consistently in error: When we did the boiling water test, the internal sensors reported temperatures up between 2.0°F and 2.5°F too high. The ambient sensor reported unstable temperatures from 3.9°F too low to 5.1°F too high.
Conclusions
It's been a long six years of MEATER resting on its laurels before they finally came out with an improved probe.
While MeatStick brought out product after product, crickets from MEATER. Combustion brought out the first probe
with multiple sensors and Bluetooth 5, crickets from MEATER. But finally MEATER has brought out a totally new
probe which attempts to address many of the complaints and shortcomings of its original offerings. Here's a summary
of the Pro's and Con's we found when testing:
| Things We Like:
|
Things We Didn't Like:
|
So, how did MEATER do with the new MEATER 2 Plus? While it does have major improvements in several areas, it still leaves much to be desired. The accuracy of the probe is suspect. There are constant annoying disconnections. They still don't let you know that the probe is charging or when it is complete, like every other brand does. And while they will probably bring out a MEATER 2 Block to provide the Wi-Fi bridge function, the Block is expensive overkill for anyone who only wants one or two probes and a simple Wi-Fi bridge. So while MEATER was the first truly wireless meat thermometer, they are no longer the only wireless meat thermometer. You would do well to check out some of the other major brands before making your decision.
Availability
The MEATER 2 Plus Probe is now available to the general public via the MEATER website. You cannot order the MEATER 2 Plus Probe
from Amazon yet, but you can
order the original MEATER, MEATER+ and MEATER Block products through Amazon:
Contact Information
Apption Labs, Inc.
3779 Cahuenga Blvd.
Los Angeles, CA 91604
Apption Labs Limited
66 Commercial Square
Leicester, LE2 7SR
United Kingdom
General Email: hello@apptionlabs.com
Support Email: support@apptionlabs.com
Web: https://www.meater.com
Facebook: https://www.facebook.com/apptionlabs/
You can support this website by shopping at The Naked Whiz Website Store and Amazon.com
|