|
|
Cooking With The MeatStick Mini
Pork Loin Filet: The MeatStick Mini is intended for shorter cooks and smaller pieces of meat. We cooked a "Pork Loin Filet" using the MeatStick Mini. What's a Pork Loin Filet? It's Smithfield Foods' way of saying take a whole pork loin, cut it lengthwise into 2½-inch diameter strips and call it a filet. Looking at the packaging in the meat case at the store, you'd think it was a pork tenderloin. But we digress. First we inserted the MeatStick Mini probe into the end of the loin before placing the loin in our cooker. Notice how it is inserted all the way up to the ceramic handle. There is no "minimum insertion line". It goes all the way in.
We then used the MeatStick App to set up a pork loin smoke for the MeatStick Mini probe. This is how the probe appeared on the WiFi Bridge display and in the App's "Now Cooking" screen. Notice the absence of an ambient temperature since this is the MeatStick Mini probe:
The App suggested a finishing temperature of 145°F and a warning temperature of 140°F, which we accepted when we started the cook. There isn't much to talk about in the cooking of a piece of pork loin. The temperature rose to 140°F when we got the warning alert. We removed the meat from the cooker and carryover just took the meat up to 143°F, so we never got a meat done alert. We suppose with a piece of meat this small, there just isn't enough momentum to get a full 5°F of carryover. Here's what the meat looked like when we sliced into it.
That looks perfect! So how did the App handle predicting the finish time? This table shows how the App predicted the finish time, with entries taken at significant points in the cook:
| Meat Temperature | Elapsed Time | Predicted Remaining Time | Predicted Finish Time |
|---|---|---|---|
| 40° - 104° | Up to 00:26:50 | --:-- | --:-- |
| 104° | 00:26:50 | 1:09 | 1:35 |
| 104° | 00:29:06 | 0:40 | 1:09 |
| 110° | 00:29:37 | 0:26 | 0:55 |
| 122° | 00:35:29 | 0:18 | 0:53 |
| 127° | 00:38:17 | 0:06 | 0:44 |
| 129° | 00:39:39 | 0:08 | 0:47 |
| 134° | 00:42:43 | 0:07 | 0:49 |
| 139° | 00:45:18 | 0:04 | 0:49 |
| 140° | 00:46:18 | Removed From Cooker | |
| 143° | 00:49:52 | Carryover Finished - Meat Is Done | |
Beef Plate Ribs: The MeatStick Mini is intended for shorter cooks and smaller pieces of meat. We thought, however, we'd try cooking a piece of meat that would possibly stretch the Mini's battery capacity. We also wanted to check how well it predicts the finish time, given that it has no ambient temperature sensor to provide information about the cooker temperature. So, we chose Beef Plate Ribs. They would take about 7 hours to cook and they also undergo a bit of a "stall" during the cooking process. We realize that Beef Plate Ribs are done around 200°F and the Mini can only go up to 185°F, so for the purposes of this test, the ribs were done at 180. We then removed the Mini and kept cooking using another probe.
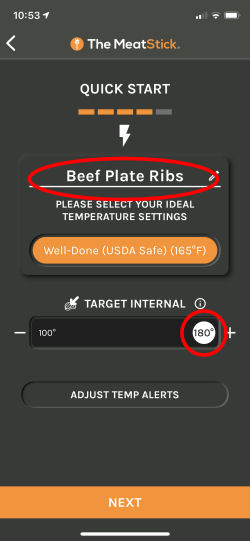 Since the MeatStick App has no options for cooking Beef Ribs, we chose the "Quick Start" option, setting the target temperature to 180°F and changing the name to "Beef Plate Ribs." |
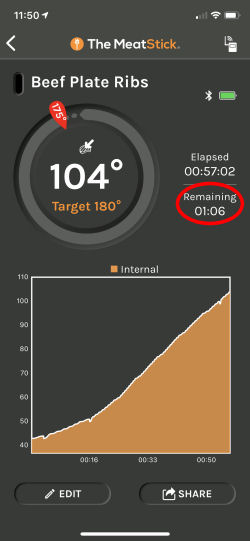 The MeatStick App made its first prediction of the finish time at 57 minutes and 2 seconds into the cook. The prediction was 1 hour and 6 minutes, yielding a total cook time of 2 hours and 3 minutes." |
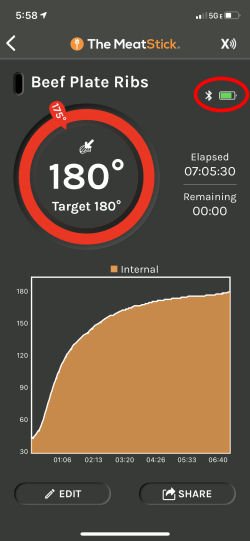 After a total cook time of 7 hours 5 minutes and 30 seconds, the Mini still showed quite a bit of charge left in its battery. Our experience however, is that once the charge gets down near the halfway point, it drops rapidly from there. |
Here is the data from a few significant points during the cook:
| Meat Temperature | Elapsed Time | Predicted Remaining Time | Predicted Finish Time |
|---|---|---|---|
| 40° - 104° | Up to 00:57:02 | --:-- | --:-- |
| 104° | 00:57:02 | 1:06 | 2:23 |
| 132° | 01:35:02 | 1:35 | 3:10 |
| 153° | 02:32:54 | 1:16 | 3:48 |
| 160° | 03:02:00 | 1:27 | 4:29 |
| 168° | 03:59:07 | 1:30 | 5:29 |
| 174° | 05:14:15 | 1:20 | 6:34 |
| 176° | 06:11:11 | 1:20 | 7:31 |
| 180° | 07:05:30 | Removed From Cooker | |
Here's how the MeatStick App handled the cook:
Cooking With The MeatStick
The MeatStick is the probe intended for longer cooks and larger pieces of meat. We cooked two
pieces of meat, a beef eye of round and a pork butt which would give us the added information
about how the MeatStick App handles "the stall." We also cooked a baked potato just because
we could.
Beef Eye of Round: Cooking a beef eye of round is pretty straightforward. The MeatStick App does not have an option for eye of round, so we picked whole tenderloin instead. (Edit: We later found an option for Beef Eye of Round under the "Oven" cooking method.) The only difference it might make is in the selection of the target temperatures, and of course you are free to tweak them on your own. As we mentioned earlier, the MeatStick probe no longer has a minimum insertion line etched onto the shaft. You must insert the probe all the way to the black ceramic handle, as shown in the following photos:
The MeatStick App chose a warning temperature of 140°F and a final target temperature of 145°F which was fine by us. We took the meat out of the cooker when it hit the warning temperature and let it rest until it hit the final target temperature. As you can see, the meat was a perfect medium, all ready for pit beef sandwiches.
Below is the graph of the cook which was generated by the MeatStick App. As you can see, it's pretty simple with an eye of round. The temperature simply rises at a steady rate until done. There is no "stall". We would like to point out one other thing. We have added the yellow horizontal line to the graph. It represents the actual ambient temperature in the cooker, 365°F, as measured by another device at the grid level. The ambient sensor on the MeatStick does not give you an accurate indication of your cooker's overall temperature. Rather, it shows the temperature of the air about an inch away from the big piece of meat. The temperature of the meat itself influences the ambient reading from the probe. We would stress that the ambient reading from the probe is intended to be used by the MeatStick's App in order to assist in predicting the finish time.
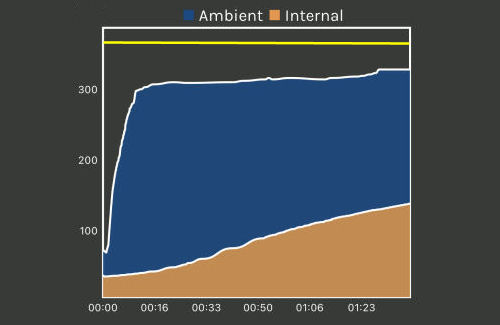
MeatStick App's graph of the Eye of Round Cook.
Pork Butt: We cooked a pork butt in order to see how the MeatStick App deals with the "stall" that occurs when cooking pieces of meat like pork butts and briskets. So no photos with this cook, just data.
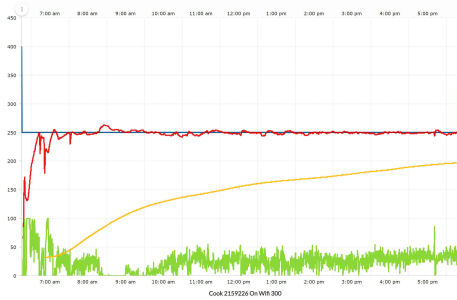
Here we have the graphs of the cook. On the left is the graph produced by the Flame Boss App. (We used a Flame Boss temperature controller to control the cook.) On the right is the graph produced by the MeatStick App.
We'll point out again the way the MeatStick's ambient temperature deviates from the actual cooker ambient temperature. As you can see in the Flame Boss graph, the cooker's temperature was fairly steady over the duration of the cook, while the MeatStick's ambient sensor took 6 hours to reach the actual cooker temperature at the grid level. Also, the ambient temperature at the grid level was a lot more erratic than it was at the dome level. Again, we suggest you just ignore the MeatStick ambient temperature and let the MeatStick App use it as it was intended.
Graph of the pork butt cook produced |
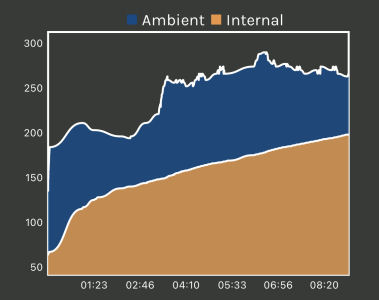
Graph of the pork butt cook produced |
So let's take a look at how the MeatStick App predicted the finish time of the cook throughout the cook:
| Meat Temperature | Elapsed Time | Predicted Remaining Time | Predicted Finish Time |
|---|---|---|---|
| 40° - 126° | Up to 01:24:13 | --:-- | --:-- |
| 126° | 01:24:13 | 4:40 | 6:04 |
| 141° | 02:29:23 | 4:56 | 7:26 |
| 149° | 03:25:25 | 6:05 | 9:30 |
| 161° | 04:26:45 | 4:27 | 8:53 |
| 169° | 05:25:25 | 4:46 | 10:11 |
| 183° | 06:58:53 | 2:07 | 9:05 |
| 187° | 07:26:34 | 2:07 | 9:33 |
| 194° | 08:26:14 | 1:05 | 9:31 |
| 198° | 08:56:00 | Received Early Warning | |
| 199° | 09:25:53 | 0:23 | 9:48 |
| 203° | 09:34:53 | Cook Is Done | |
Here's how the MeatStick App handled the cook:
Baked Potato: You won't find vegetables in any of the cooking types in the MeatStick App. But we were doing some playing around looking at the ambient temperature sensor and an easy way to do this is stick the probe into a potato. The potato keeps the probe safe from the high temperatures and allows you to do whatever else it is you want to do. And in the end, you get a perfectly cooked potato!
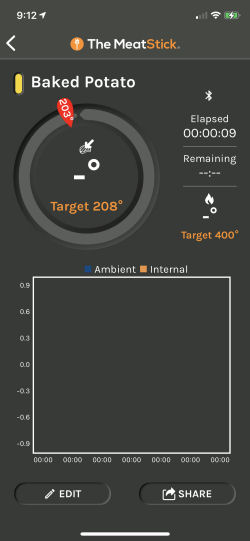
So in order to cook our baked potato, we chose a Quick Start cook and selected a target food temperature of 208°F and a target ambient target of 400°F (not that we really cared about the ambient temperature). We also change the name of the cook to "Baked Potato" and proceeded to cook.
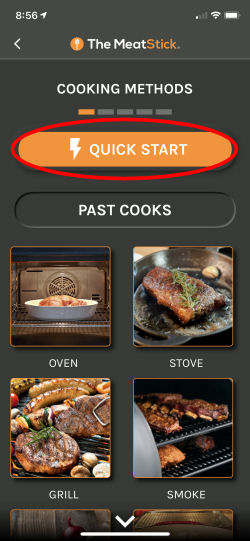 Step 1. When you set up the cook, select "Quick Start" from the Cooking Methods screen. |
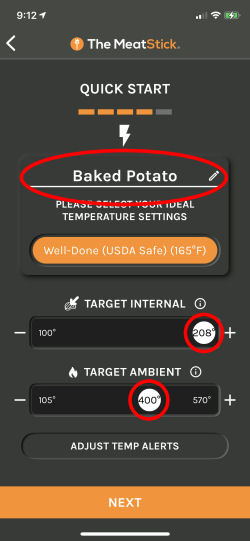 Step 2. From the set up screen, move the two sliders to choose the target food and ambient temperatures. You can also change the name from "Quick Start" to "Baked Potato". |
 Step 3. You have now created a custom cook. |
So, here's the graph produced by the MeatStick App showing how the baked potato cook went. As you can see, it's rather boring. The temperature simply rose until the potato hit 208°F when we took it off the cooker.
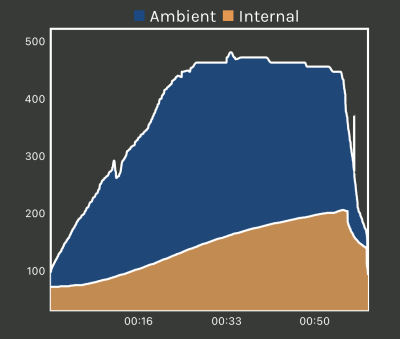
Graph of the Baked Potato cook.
You can support this website by shopping at The Naked Whiz Website Store and Amazon.com
|