|
|

Yes, there is some setup that you have to perform on The Stoker. Remember that you can control multiple cookers, so you can have multiple blowers and multiple temperature probes. Hence you need to associate blowers with the temperature probes that control them. You need to tell The Stoker which probes are for controlling a pit and which probes are for monitoring food temperatures. The small price you pay for all this functionality and flexibility is that you have to set it all up. You can configure The Stoker in one of two ways. It can be done via the key pad and display on The Stoker by navigating through the menus and setting all the values. The second way is by hooking your Stoker up to your LAN and using your PC to set all the values. The Stoker has a web server in it so you can use a web browser on your PC to access the setup information on The Stoker. (We'll talk more about how you do this in a bit....) Rather than describe in gory detail how you navigate the menus, for the sake of this review, we'll use the web interface to show you the values that need to be set and how they fit together. Below is an image of a prototype version of the setup screen (we added the "Prototype" across the screen) showing the basic setup for a single cooker with one blower, one pit probe and one food probe:
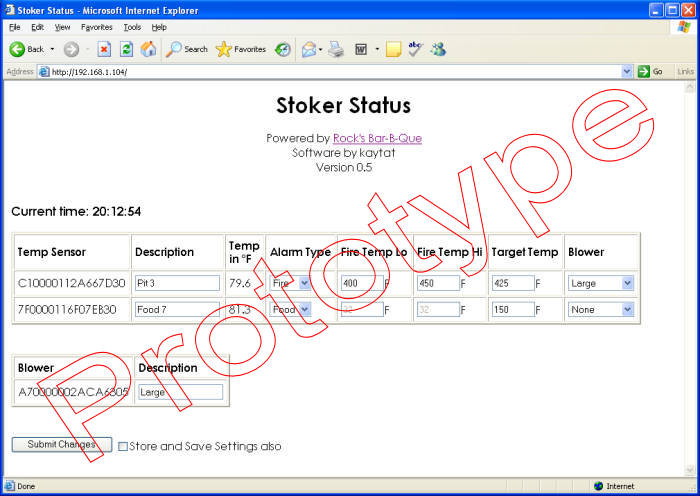
The long funny numbers under the "Temp Sensor" and "Blower" columns are the unique identifiers that are given to each device at the factory. Ignore them for now, and look at the other information which is used to set up The Stoker. The "Description" field is the name that we have given to the sensors and blowers, and these are the names that display on the Stoker. We have chosen to name the probe that monitors the cooker temperature "Pit 3". Likewise we have named the food sensor "Food7". The blower is "Large" since it is the blower which is used on our large Big Green Egg. Notice that each temperature sensor can be designated as either a "Food" or a "Fire" sensor, and that if designated a fire sensor, you can then specify a low and high temperature to sound an alarm if the cooker temperature gets out of range. You can also specify a target temperature for fire sensors, the temperature at which The Stoker will keep the cooker. You can associate a blower with any of the temperature sensors, although it only makes sense to associate a blower with a fire sensor. So, in the screen above, the fire sensor "Pit 3" is associated with the blower named "Large". The Stoker will alarm if the temperature in our first small Big Green Egg goes below 400 or above 450 degrees, and it will keep the cooker at 425 degrees. Finally, the food probe has been set to cause an alarm when the food temperature gets to 150 degrees. Any settings on The Stoker can either be set temporarily or permanently. If you are making changes via the web interface, you can check the small check box that says "Store and Save Settings also" to make the changes permanent. If you are making changes via the keypad and display on The Stoker, you will find a "Commit" option which saves the changes permanently. Permanent changes are saved in non-volatile storage and thus will be restored if you turn The Stoker on and off. Any changes that you don't "commit" are temporary in that they are stored in The Stoker's volatile memory and if you turn The Stoker on and off, the changes revert to whatever the last permanent setting was. This means that you probably only want to make permanent changes normally so that if The Stoker loses power in the middle of a cook, you won't revert to some settings that will spoil the cook. So, how does The Stoker perform in operation? Well, probably the most important thing you want to know is how well does it control the temperature of the cookers? We did a test in which we allowed The Stoker to control a large Big Green Egg cooker at 225, 325 and 425 degrees. We watched The Stoker bring the cooker up to temperature to see how far it overshot the target temperature. After the cooker settled down from the initial overshoot, we watched the temperature of the cooker through many cycles to see how big of a "swing" there was between the low and high temperatures that The Stoker permitted. Here's the results:
So The Stoker controls the temperature very nicely and keeps better control of the temperature than most, if not all, kitchen ovens. A few things we'll point out about using The Stoker:
Of course, one of the big features of The Stoker is the ability to control many cookers from one Stoker. The Stoker itself has five plugs on it, and this can be expanded through the use of the optional 1 to 2 adapter, 1 to 4 adapter, or 1 to 20 adapter. You can buy plugs and cables from Radio Shack to accomplish this or to extend the length of the cables, but be sure to check with The Stoker folks about details. Some of these plugs and cables have subtle differences in the way they connect and disconnect during the act of plugging and unplugging. You will need to get the right plugs and cables to avoid trouble. To test The Stoker's ability to control 3 cookers at the same time we set it up to control our 2 small Big Green Egg cookers and our medium Big Green Egg cooker. Here's what the setup screen looked like. Again, we added the "prototype" across the screen:
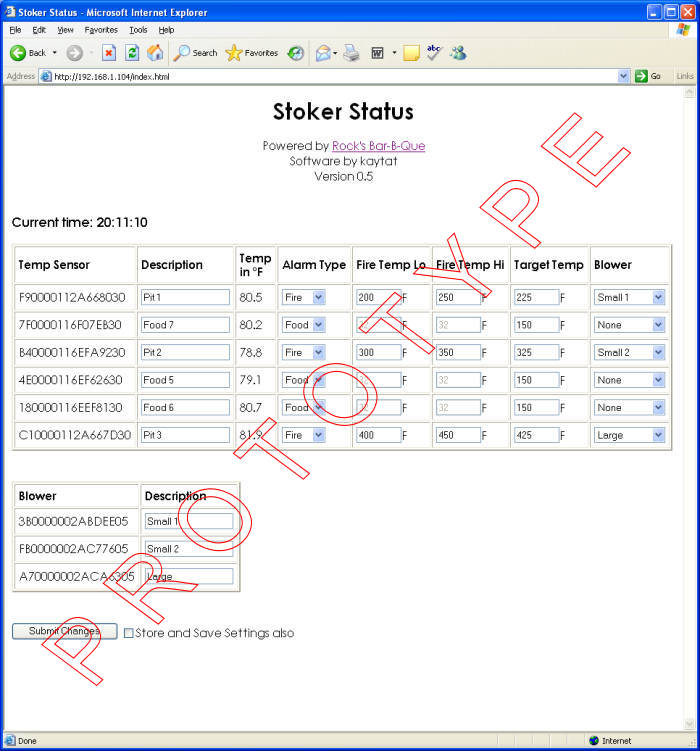
So, in this test, the pit probe named "Pit 1" controlled the blower named "Small 1". Likewise, "Pit 2" controlled blower "Small 2" while "Pit 3" You may notice the clutter of all the cables and having three cookers huddled together. Of course, in real life you would probably want to purchase some extension cables so that you could separate the cookers and keep your wires organized. We have already mentioned the "Scan" feature, but it bears repeating here. With three cookers going, you might have 6 or more temperature probes connected to The Stoker. You would have 3 pit probes connected, and perhaps 3 or more food probes connected. Rather than manually dig your way through all the probe readouts to find the temperature of one particular probe, you can select the "Scan" feature and The Stoker will automatically rotate through displaying the temperature of all the probes in alphabetical order. |
You can support this website by shopping at The Naked Whiz Website Store and Amazon.com
|