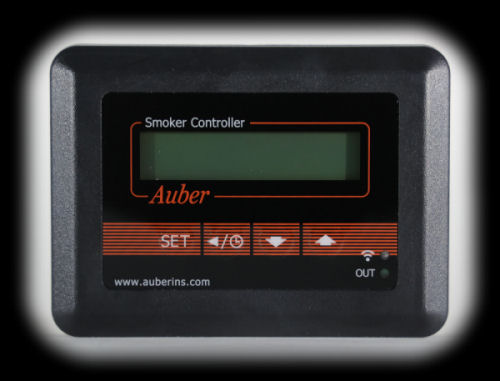
The AuberWifi App
The AuberWifi App has seen some negative comments on Facebook groups, but then what
hasn't? No, the AuberWifi App isn't as dreadful as we were led to believe. Yes, it
could be a bit more clever in the way it does things (like perhaps you could change
the cooker's target temperature from the home screen rather than have to go into a
cooking profile) but all in all, it is fairly easy to use and does everything that
you can do from the controller itself, and more. So, let's take a look at some of the
AuberWiFi screens:
The Home Screen:
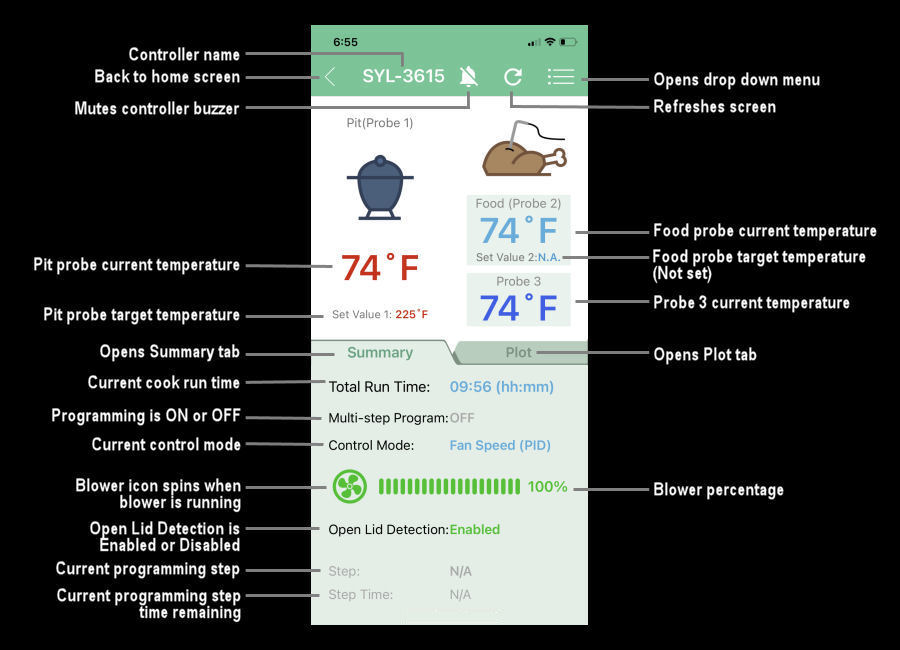
The following screen is what we'll call the "Home" screen for the App. This is the screen
that appears when you tap on a particular controller on the opening screen. The screen is rather busy and has a number
of things that display depending on the current state of things. We have dissected a representative
version of the screen for you:
Graphing Options:
As we showed you above on the Home screen, there is a "Plot" tab. When you tap on it,
the summary area switches to a graph of the temperatures and blower percentage. Graphing
is somewhat limited on the AuberWifi App. You can only show the last 2 hours or the last
10 hours of data, so you cannot graph an entire overnight cook. The reason for this is
most likely the lack of cloud functions. If the controller/App were connected to cloud
servers, they could save much more data.
Here is what the graph
looked like when set to 2 hours and 10 hours while we were playing around warming the
probes with our hands:
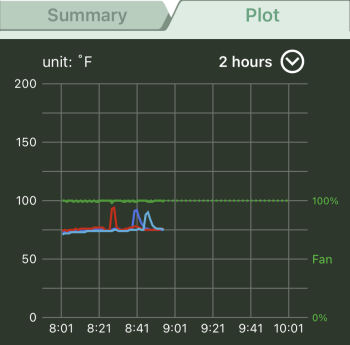
2-hour "Playing Around" Graph |
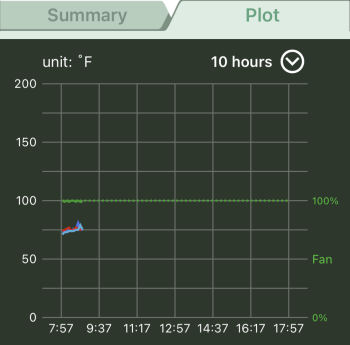
10-hour "Playing Around" Graph |
And this is a perfect example of how useless only having a data point every 6 minutes on the 10 hour graph
can be. Both graphs above were taken about 20 seconds apart. Notice how on the 10 hour graph, you barely
see any spikes versus the spikes you see on the 2 hour graph? In essence, the unit wasn't looking when
the temperatures spiked and thus you see a relatively flat plot.
Also notice that the graph does not show the pit's target temperature, a pretty huge omission. If you
make changes to the pit target temperature, you would like to be able to see when they occurred on the graph.
In order to show you a graph from an actual cook, we cooked a beef eye of round at a cooker temperature of
350°F to an internal meat temperature of 135°F. Here is what the graph looked like when set
to 2 hours and 10 hours during this cook.
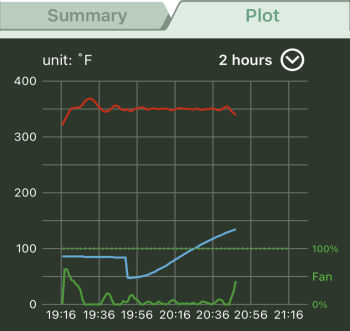
2-hour Cook Graph |
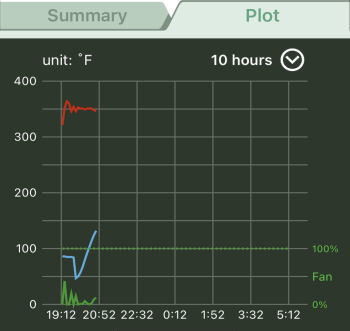
10-hour Cook Graph |
Obviously, the red line is the cooker temperature, the blue line is the meat temperature, and the green
line is the blower percentage. Finally, if you are interested, here is the spreadsheet that contains the raw data for this cook.
Cooking Profile Screen:
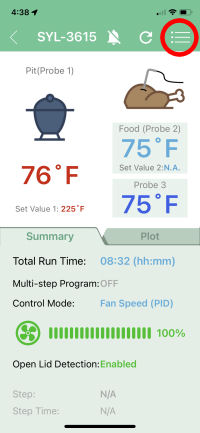
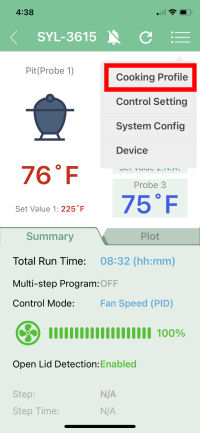
The Cooking Profile Screen allows you to set up a cooking program that contains up to 6 steps.
For each step you can specify a food probe temperature, a timer for the step, the target
Pit Temperature for the step (P2), and the condition that will end the step. Note that to use
a cooking program, you must enable the Multi-step Program feature in the System Config screen.
 |
 |
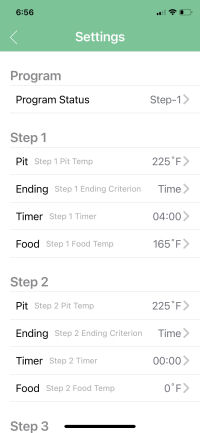 |
1. To get to the Cooking Profile Screen, tap on the menu icon in the top right corner. |
2. Tap on the "Cooking Profile" entry in the dropdown menu. |
3. Here you will see all the steps in the cooking program. You can scroll up and down to see all six steps.
Tap on any parameter to change it. |
System Config Screen:
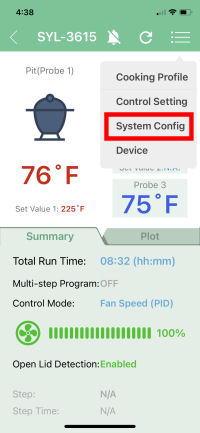
The System Config Screen contains all the configuration settings for your system:
 |
 |
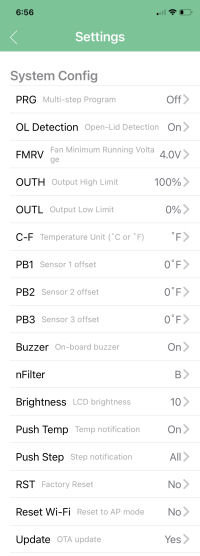 |
1. To get to the System Config Screen, tap on the menu icon in the top right corner. |
2. Tap on the "System Config" entry in the dropdown menu. |
3. Here you will see all the items that can be changed in the system configuration. |
Control Setting Screen:
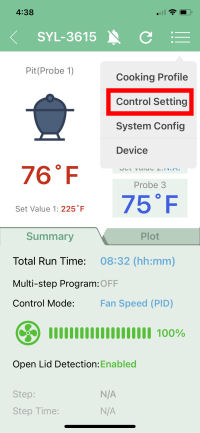
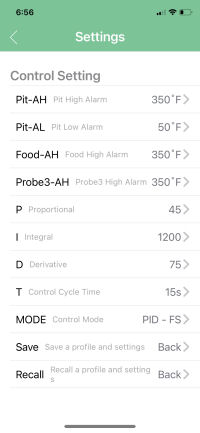
The Control Setting Screen allows to set up all the settings that determine how the Auber Instruments
SYL-3615 controller will control your cooker:
 |
 |
 |
1. To get to the Control Settings Screen, tap on the menu icon in the top right corner. |
2. Tap on the "Control Setting" entry in the dropdown menu. |
3. Here you will see all the items the determine how your controller controls your cooker. |
Device Screen:
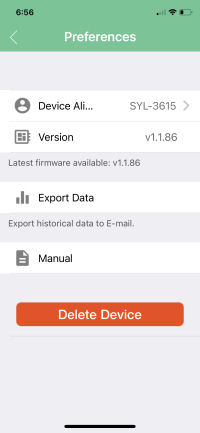
The Device Screen is where you go to rename your device, see the firmware level, export data
or open a webpage to view the manual for your controller. (At this writing, the manual is
"Coming Soon".) You can also delete your controller if you decide to start over.
 |
 |
 |
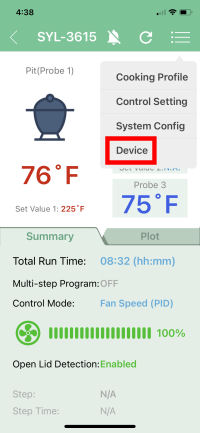
1. To get to the Device Screen, tap on the menu icon in the top right corner. |
2. Tap on the "Device" entry in the dropdown menu. |
3. Here you will be able to see and alter information that relates to your controller. |
Access To Raw Data
Some users find it useful to access the raw temperature and blower data so they can graph it themselves
and possibly do some sort of analysis on it. The AuberWifi App does provide access to a small amount
of raw data, but because the data must be stored within the controller itself due to lack of cloud
functionality, this data is severely limited.
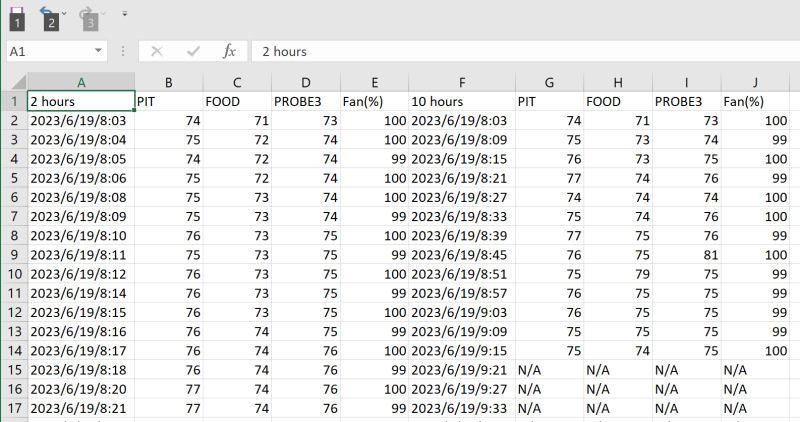
It can export a spreadsheet (.CSV format) that contains the readings for the three
temperature probes and the blower percentage. It is limited in that it only provides the last 100 readings for
either 2 hours and 10 hours. In the case of the 2 hour section of the spreadsheet, you will find that
readings are recorded at 1-minute intervals. For the 10 hour section, readings are recorded at 6-minute
intervals. Another problem with the raw data collected is that the pit target temperature is not
included. Here is what a sample spreadsheet looks like:
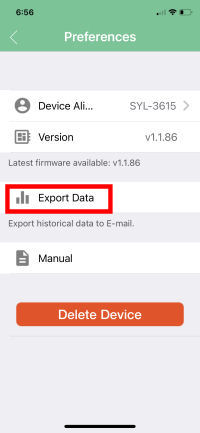
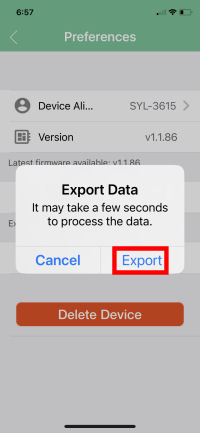
To export the data, the AuberWifi App will send you an email that contains the .CSV file. Here is how
you export the data in the App:
 |
 |
 |
 |
1. To get to the Device Screen, tap on the menu icon in the top right corner. |
2. Tap on the "Device" entry in the dropdown menu. |
3. On the Device Screen, tap on "Export Data". |
4. On the "Export Data" popup, tap on "Export". An email window will open up where you can specify the recipient and send the email. |
All in all, we find the AuberWifi raw data next to useless. Not enough datapoints and not enough time.
Amazon Echo/Alexa Support
The Auber Instruments SYL-3615 controller does not support Amazon Echo/Alexa or Google Assistant.
←Previous Page
Next Page→
nakedwhiz.com
Home
Search Our Site
Email The Whiz
Listen To Whizcast
Whizlog
Buy Whiz Gear
Privacy Policy
All Contents ©2001, 2023 The Naked Whiz
International Association of Fire Safety Science member #1604
You can support this website by shopping at
The Naked Whiz Website Store and
Amazon.com
 |
You can make donations to The Naked Whiz
Website using Bitcoin! Scan the QR code at
left or copy and paste our wallet ID:
1Bt4vjU9PUQNVvEZZq6ik6jWYr6nr4rJRp
|
 |
|
| 


