 |
 |

Introduction FireBoard temperature controllers have a pretty loyal following, so we decided it was about time to do a review and find out what the FireBoard is like. This is our 28th temperature controller (assuming we counted right) and we were eager to see what FireBoard has done that the other 27 haven't, or perhaps the reverse. In any event, here's our review of the FireBoard 2 Drive temperature controller. There are several models of the FireBoard:
Features and specifications for the FireBoard 2 Drive controller:
List of features and specifications for the temperature probes:
List of features and specifications for the FireBoard Drive 20 CFM Blower:
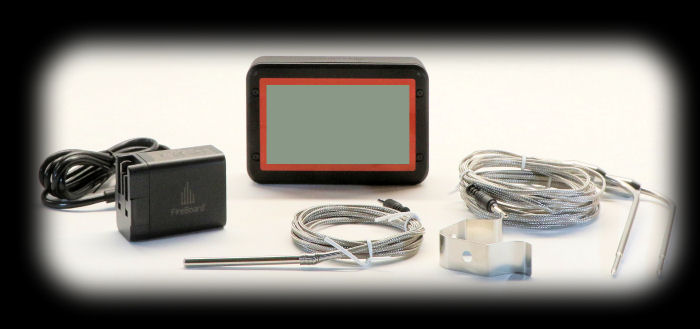
Compared To Other BBQ Temperature Controllers Like most other temperature control systems, the FireBoard 2 Drive controller is blower-based, controlling airflow through the cooker by blowing air when needed. It has a few features not available on other systems like ports for 6 temperature probes, the ability to create control programs, a big LCD screen, and an internal rechargeable lithium-ion battery that can power most blowers. The FireBoard 2 Drive package comes with the following items:
(The blower is sold separately and comes with two mounting plates. We'll get to the blower shortly.)
A Few Observations About The Components The control unit feels very much like a small brick. We imagine you could play catch with it and not damage it. The controller uses a USB-C connector for power instead of the inferior micro-USB plug. The temperature probes feel pretty solid in that they have strain relief and solidly snap into the ports on the controller. The blower also feels very solidly built. The control unit is 4.4" x 2.8" x 1.1" in size and weighs 8.0 ounces. On the front is a 3⅜" x 1¾" LCD display along with 2 colored LEDs. There is no dedicated power switch, per se, as power is turned on by simply pressing any of the 3 buttons on the side or applying power to the USB-C port. Powering off is accomplished by pressing and holding any of the 3 buttons and then selecting the POWER OFF menu item. The unit has connections for 6 temperature probes, power, a blower and an Aux connector. There are no provisions for mounting the unit such as screw holes or magnets, but you can purchase an optional stand that holds the unit.
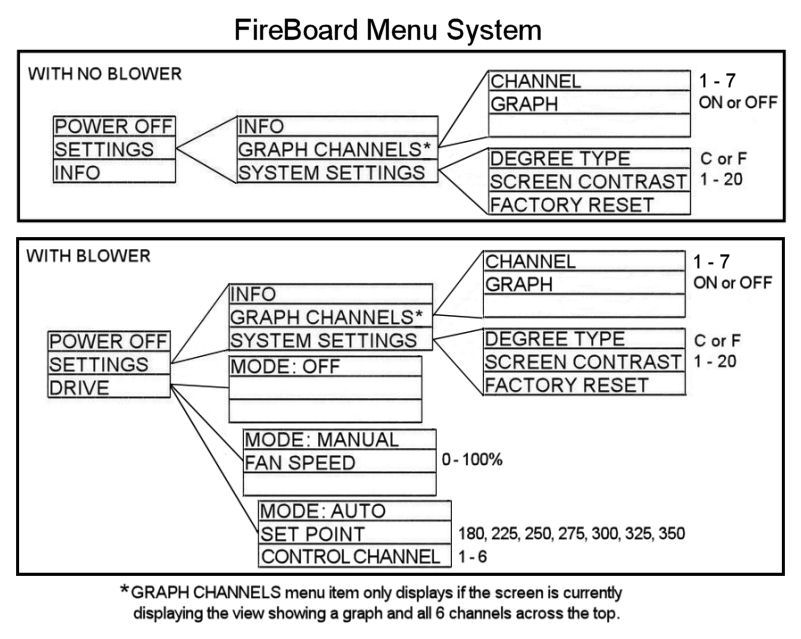
You can press any button to power on the unit. You can also press and hold any button for about 2 seconds and a menu will appear on the display. The menu will contain 3 items, each lined up with one of the 3 buttons. So for example, if you press and hold a button, the menu pops up and the top item is "Power Off". So, if you press button 1 (which is lined up with the top menu item) the unit will power off. The buttons also control what displays on the unit: Button 1 — Scrolls between the four different views of the current probe readings: All 6 channels, one channel with large numbers, one channel with temperature graph, and one channel with temperature graph but with all 6 channels across the top of the screen. Button 2 — Scrolls the screen between the 6 channels. Button 3 — On the screen with all 6 channels displayed (the Multi-Channel Temperature screen), pressing button 3 turns on/off the channel label and replaces it with a small graph of the temperatures. On the screen with a single channel and large numbers display, it makes the numbers smaller. On the screens with temperature graphs, it scrolls the horizontal time scale between 1 minute, 30 minutes, 1 hour and 12 hours. In this next diagram, we have charted out for you the entire menu system for the Fireboard control unit. (Note that there are many more options available only through the FireBoard App.) As you can see, the structure of the menus can change depending on whether or not you have a blower plugged in, and depending on what display is currently on the screen.
 Some oddities we found in the menu system:
Physically, the buttons are somewhat clumsy to use. They are flush with the body of the unit so it is hard to select a button by feel. Also, the buttons are somewhat hard to press. Given the short amount of time that the menus display, you may often find yourself fumbling for a button only to have the menu disappear before you can make your selection. Using the buttons would be easier if they were slightly proud of the case surface. |
You can support this website by shopping at The Naked Whiz Website Store and Amazon.com
|