 |
 |
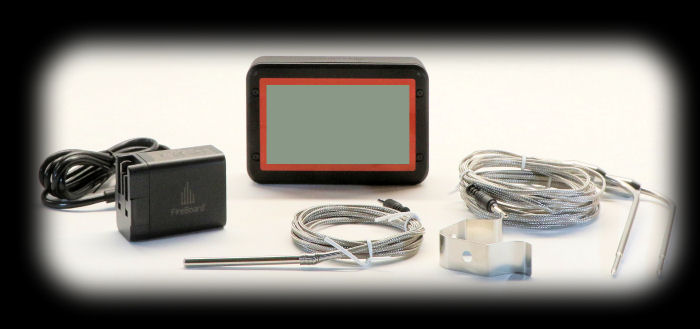
The display on the control unit is a 3⅜" x 1¾" Liquid Crystal Display (LCD). It is backlit and contains 32,768 (256 x 128) pixels. The backlight can be configured to stay on or time out in device settings. The backlight is brighter if the unit is plugged into power, and dimmer when running off the battery. The display is extremely easy to read in bright sunlight. There are also 2 multi-color LEDs in the top 2 corners that convey information.
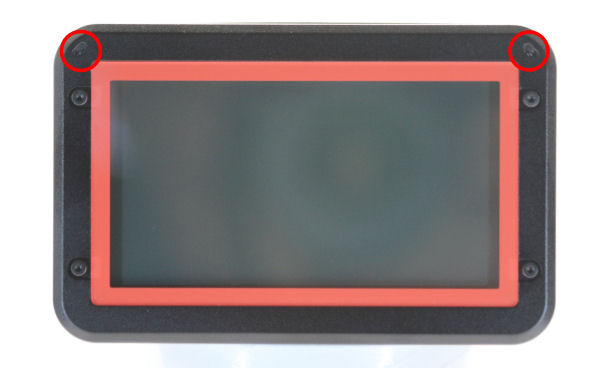
The FireBoard display with the two multi-color LEDs circled in red.
Closeup of the FireBoard display showing a few of the 32,768 pixels (256 x 128). The display will rotate 180° if you rotate the unit itself. When the display rotates, the menu items that pop up when you press and hold a button will move from the normal left hand side of the display to the right side of the display in order to be positioned next to the buttons.
Next we will show you the four screens that you can select from to display your temperature information. Here they are shown in the order they appear when you press Button 1 to move from screen to screen, with the names used by FireBoard:
If you power off the unit and then later power it back on, it will display whichever screen was being displayed when you powered it off. However, it will always change the current channel to channel 1 and you will have to press Button 2 to cycle through the channels until you have the one you want. One handy feature in the menus is the ability to control the appearance of the Multi-Channel Temperature & Single Channel Graph display (that's the one with all six channels displayed across the top and a graph displayed below). If you have six probes plugged in, the graph may get somewhat cluttered. So, while displaying the Multi-Channel Temperature & Single Channel Graph display, you can go into settings, pick the Graph Channels option and then turn the graph on or off for each channel. Here's the Info screen that you can get to by pressing and holding any button to get the menu, then navigating to the "Info" item and selecting it with the appropriate button. (Puzzlingly, the location in the menu structure varies depending on whether or not you have a blower plugged in.) 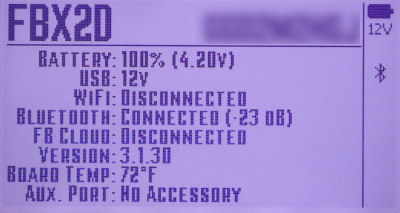
The FireBoard Info Screen As you can see, the Info screen contains some interesting information. You can find out:
Here is a photo of one of the screens that shows some of the elements that go into making up the screen: 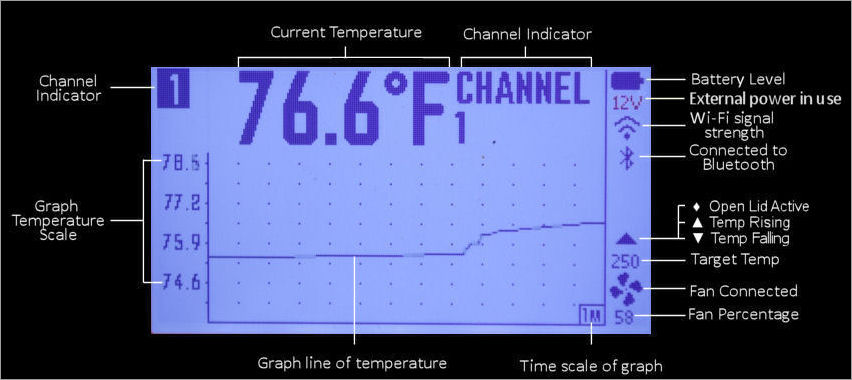
Various elements that make up the FireBoard display. There are also two multi-color LEDs on the front of the unit in the top right and left corners. This table shows what they mean:
All the connections are on the bottom and right edges of the control unit. Along the bottom edge from left to right are the plugs for the 6 temperature probes (numbered 1 through 6) and the USB-C power connector. Along the right edge from left to right in the photo is the 2.5mm barrel plug connector for the blower and the mini-DIN socket for the Aux Port
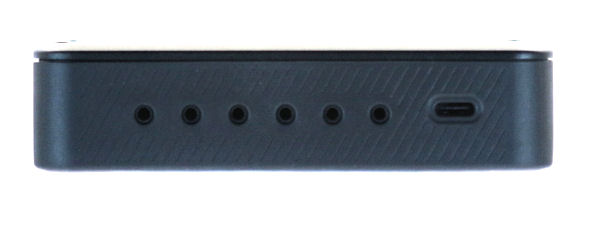 Sockets for the 6 temperature probes and USB-C power plug.
2.5mm barrel plug socket for the blower and the Aux Port. There is no reset button on the FireBoard controller. To do a Factory Reset, you must power on the unit and then select the FACTORY RESET option through the menus. The FireBoard controller is powered by 5VDC-12VDC, USB-C Power Delivery. It comes with a power adapter that can be used with 100-240 VAC, 50-60 Hz, 0.5 Amp. Also included is a USB-C cord. Since the unit has a standard USB-C connector, you also have a number of alternatives for powering the units. Any powerbank with USB-C output can be used. And another alternative is the Auber Instruments 12V DeWalt Battery Pack Adapter that we recently reviewed. This, in conjunction with 2.5mm barrel plug to USB-C cable, will power the unit for a long time. And of course, the FireBoard 2 Drive unit has an internal Lithium-Ion battery that can be used by itself to power the unit and a blower. The maximum operating time for the battery is approximately 30 hours. Of course this will be reduced when operating a blower. (According to FireBoard, the internal battery is powerful enough to run the FireBoard blower at 100% when fully charged, but larger blowers may not run at 100% unless the controller is plugged into USB power. However, we found that without external power, the FireBoard unit could only drive the FireBoard blower at about 60% speed.) The FireBoard should take between 4-6 hours to charge. The controller can be powered from USB and recharge at the same time. Also, the controller will charge when powered off, although there is no indication that it is charging. The controller will turn on when it is plugged into USB Power.
FireBoard controllers can officially support RTD PT-100, 100K Thermistor and 10K Thermistor probes, however the probes supplied with the unit are what FireBoard calls their Extreme Probes which are 100K thermistors. Specifically, the controller comes with 1 SANT311T ambient/pit probe and 2 SF311T food probes. Here are the specifications on the probes:
FireBoard also sells "Competition" versions of their food probes that have the same temperature ratings as the Extreme Probes but are shorter, straight probes. They also sell RTD ambient and food probes which are rated to higher temperatures but are slower to respond to temperature changes. A grid clip is provided with the pit probe which you can use to clip the probe to your grid. You may wish to invest in a packet of alligator clips which will slip over the ambient probe and allow you to clip your ambient probe to your dome thermometer or the food grid, as you see fit.
The probe and the wire should be shielded from direct radiation from a hot fire. Do not let it come into direct contact with flames. If you need to shield the wire, you can place a layer of aluminum foil beneath it. Also, having the pit probe itself exposed to direct radiant heat can cause it to register a temperature which is higher than the air temperature in the cooker, and thus fool the controller into cutting back on the fire. One note of warning regarding the different probe types. You need to be sure that you know which type of probe you are using since you must configure (in the App) each channel for the type of probe that you will be plugging into it. You won't hurt anything if you misconfigure a port, but it won't give you correct readings unless it is configured correctly. It is also worth noting that you can also use Thermoworks Pro-Series probes with your FireBoard. They are slightly more expensive, but we have see numerous claims in the FireBoard group on FaceBook that they last longer. Whatever, we have verified that they do indeed work with the FireBoard controller. They are 100K Thermistor probes so be sure your FireBoard is configured for that type of probe. We can also report that probes for Polder Thermometers do NOT work with the FireBoard controller. Although they have the same 2.5mm audio plug, they do not give a reasonable reading, regardless of how you configure the channel for the FireBoard controller. As stated in the probe specifications, probe accuracy should be ±0.7°F (±0.4°C), ±0.1% of reading. We measured the room temperature, the temperature of boiling water and the temperature of ice water using the Fireboard controller and a Thermoworks Thermapen. We used our boiling point calculator to determine the boiling point of water in our location to be 211.9°F. Here are the results:
As you can see, all the probes recorded temperatures that were well within the stated 0.7°F accuracy specification. And when you compare this performance to the typical kitchen oven, you can see that this is pretty exceptional accuracy. Here is how well our $2200 Bosch oven holds 300°F:
 That's a 43°F swing on the last oscillation. An error of a few degrees on your pit and food temperatures isn't going to affect your cooking. There is a way to "calibrate" your temperature probes using the App, however you need to be aware of what you are doing lest you confuse things. If you go into Settings, tap on your device, tap on Advanced Settings, tap on Probe Configuration, and then tap on the channel you wish to "calibrate", you are given the opportunity to enter a "Calibration Offset" for that channel. You can enter positive or negative values for the "Calibration Offset". If, for example, channel 1 probe is reading 75° and you enter a +1 for the offset, then channel 1 will read 76°. Obviously, if you enter -1 for the offset, the channel will now read 74°. We should note that if you have a particular probe plugged into channel 1 and you "calibrate" it, you should remember to plug that probe into channel 1 always. You are not calibrating the probe, you are calibrating the channel. If you plug it into another channel, you will now have two channels that read wrong. Frankly, we wouldn't bother with this unless we had a probe that was off by a considerable amount and even then we would probably replace the probe. A few degrees isn't going to make any difference in your cooking. More than a few degrees is probably a defective probe.
|
You can support this website by shopping at The Naked Whiz Website Store and Amazon.com
|
.