 |
 |

Thermometer Accuracy
The MEATER probes contain two temperature sensors. Per the MEATER FAQ on their web site, the meat sensor is located about ⅓ of the way up
the probe from the tip. According to an email from the Apption Labs lead test engineer, the ambient (or pit) sensor is located in the black
ceramic portion of the probe. We asked what type of sensors were used (thermistor? thermocouple? platinum RTD?) but
the only answer we could get was that "MEATER uses a precision calibrated digital sensor for the probe's internal
temperature."
Meat Sensor: As for accuracy, During the pork butt cook we used the Flame Boss meat probe as well as the MEATER probe. Initially, both probes gave identical readings for the cold piece of meat. Once cooking commenced, however, the MEATER probe consistantly read higher than the Flame Boss probe on the order of 7° to 12°F higher. When the meat was done, the MEATER probe read 6°F higher than the Flame Boss probe. Based on the pullability of the pork butt, we tend to believe the Flame Boss probe.
You may ask why we didn't do the old "boiling water" test. We did. But here's what happens when your food probe approaches the boiling point of water:

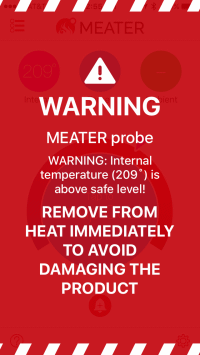
As we mentioned earlier, the way that MEATER keeps its delicate electronics safe from heat is they locate them in the probe shaft where they will be protected by the meat you are cooking. But the electronics can only take so much heat, and obviously when we put the probe in boiling water, we are exceeding any reasonable temperature for a piece of cooking meat. The result is that you get the "Dive! Dive! Dive!" sound effect and the red screen of death warning you to take immediate action.
Ambient Sensor: The MEATER's ambient sensor is a curious story. First of all, when cooking the spatchcocked chicken, it took the MEATER's ambient sensor 18 minutes to stabilize at a temperature that was about 30°F below the temperature measured by our dome thermometer. To get a better reading on this, we used our Flame Boss 300 temperature controller for the pork loin cook, placing the Flame Boss pit probe as near as possible to the MEATER ambient sensor. It took the MEATER probe 12 minutes to stabilize at a reading 25°F below the actual pit temperature. It slowly crept up from there, producing a much closer reading after 36 minutes. During our pork butt cook, it took the MEATER probe almost 2 hours to reach a reading that was relatively close to matching the temperature of the cooker.
Reading the FAQ on the MEATER web site, one of the longest answers we came across was trying to explain the behavior of the ambient sensor. It mentions things like a bubble of cool air that exists near the surface of the cold meat. It mentions that you mustn't insert your probe too deeply into the meat lest the ambient sensor be too close to the cold meat. It goes on to mention other things that could affect the temperature reading: the roasting pan, using a glass container, the proximity of the ambient sensor to the walls of the cooker, the “cold” spots of the oven, the size of the roast, etc. MEATER claims that this is a better way of measuring the temperature of your cooker since it is measuring the temperature of the air near the meat. Our feeling is that the ambient sensor is of little use for measuring the temperature of your cooker due to the long period of time it takes for the sensor to actually reflect the temperature inside your cooker. You definitely would not want to try to get your cooker stabilized at any particular temperature using the MEATER's ambient sensor.
However, the ambient sensor is not totally useless by any means. If you dig into the Apption Labs patent application and look at paragraph 46:
"As noted above, more accurate predictions on completion time and resting temperature rise can ordinarily be made by utilizing dual-sensor technology. Using an ambient or external thermal sensor in or near the third portion 102 can enhance estimation of heat input at the location of the food 108, which can vary when the food 108 is moved, turned, or when changes in cooking environment occur, such as opening the hood of a BBQ, adjusting heat on a gas grill, or charcoal fuel losing heat. The heat input at the location of the food 108 can be estimated more accurately using an ambient or external thermal sensor adjacent an exterior surface of the food 108 and measuring the ambient temperature over a period of time."In other words, you can better estimate the completion time of your cook if you know the temperature of the air immediately adjacent to the meat you are cooking. As we saw, the MEATER app was able to give a pretty good estimate when cooking ordinary foods, and even for foods with temperature stalls once the food exited the stall. So we would just ignore the ambient sensor's reading and let the MEATER Probe use it for its own purposes.
Connectivity Methods
There are two ways for your smart device to connect to the MEATER Block: MEATER Link and MEATER Cloud. Unlike the MEATER Probe and
MEATER+ Probe, the MEATER Block probes will not connect to any device other than the MEATER Block. Therefore you cannot use a probe
from the MEATER Block by itself and connect to a smart device using Bluetooth.
Update (10/11/19): We discovered that we missed an important connectivity option for the MEATER Block probes. If your MEATER Block's batteries are dead, you can indeed connect your smart device directly to the MEATER Block probes. Go into the MEATER App and click on the settings icon. Down near the bottom, you will find an option "Allow Pairing MEATER Block Probes". Turn it on, and now your smart device will pair with the MEATER Block probes. As long as your MEATER Block is turned off and the probes are removed from the charging port, you can view them in the App. However, don't forget to turn this option off when you are able to use your Block again. You want the probes to pair with the Block, not your smart device.
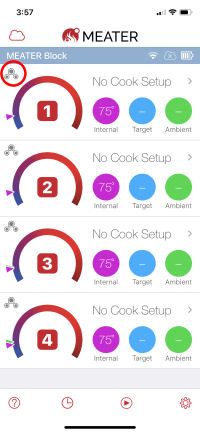
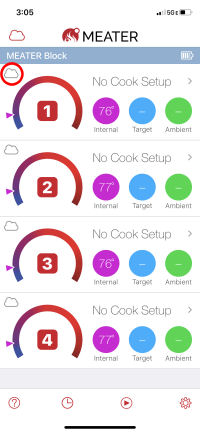
MEATER Link: This method allows a smart device to connect to the MEATER Block over your network without going out to the internet and connecting to the MEATER Cloud servers. Both the smart device and the MEATER Block must be connected to the same network. Also, the smart device must be running the MEATER app and must have MEATER Link enabled.The following screen shots show you how to identify which method you are currently using to connect. The small icon circled in red at upper left shows from left to right, MEATER Link, and MEATER Cloud.MEATER Cloud: This method allows a smart device to connect to the MEATER Block by going out onto the internet and connecting via the MEATER Cloud Servers. The Cloud function must be enabled on the MEATER Block. Your smart device must be running the MEATER App, have MEATER Link enabled and have MEATER Cloud enabled. This method is used when your smart device and the MEATER Block are connected to different networks, for example when your smart device is away from home and using a cellular data network. Note, however, that if your smart device returns home and connects to your network, communications will automatically switch from MEATER Cloud back to MEATER Link.
 Smart phone connected to |
 Smart phone connected to |
Problems We Encountered
We didn't encounter any problems specifically dealing with the MEATER Block during our testing. We encountered two problems during our
testing of the MEATER Probe which may or may not occur with the MEATER Block:
MEATER Link: When testing the MEATER Probe, initially we were unable to get the MEATER Link function working. We tried every combination of settings that we could come up with, but we could never connect a remote smart device to the monitoring smart device via wifi. We have been in contact with MEATER customer support and we were able to determine what was causing the problem, although at this time, we don't fully understand why. We had previously reserved an IP address in our router and had forwarded HTTP traffic (port 80) to that IP address. This was done to enable access from our smart phone to our Stoker wireless temperature controller. (You can read more about why this was necessary in our review of the Stoker product wireless setup instructions.) Again, we don't understand yet why this interfered with the MEATER Link function, but as soon as we reset those functions back to their default states, MEATER Link immediately began working. MEATER customer support is still looking into this, but as long as you haven't gone into your router settings and fiddled with DHCP Reservations and Port Forwarding, you won't experience this problem. And of course, this really isn't an issue since if MEATER Link isn't working, your remote device will connect via MEATER Cloud. We don't know if this problem exists for the MEATER Block, but if you find that you can't use MEATER Link, it is something to look into.Probes not turning on or off: This is also not specific to the MEATER Block, but if you have trouble with a probe not turning on or off, cleaning the electrode with fine sandpaper may solve the problem. Keep that electrode clean and you should have no problems.
Availability
The MEATER Block is now available to the general public. (We had obtained ours as the result of the original Kickstarter project.)
You can order MEATER Block on their website. You can also order MEATER products through Amazon:
Conclusions
Although it took a long time for the MEATER Block to make it to the marketplace, the wait was worth it.
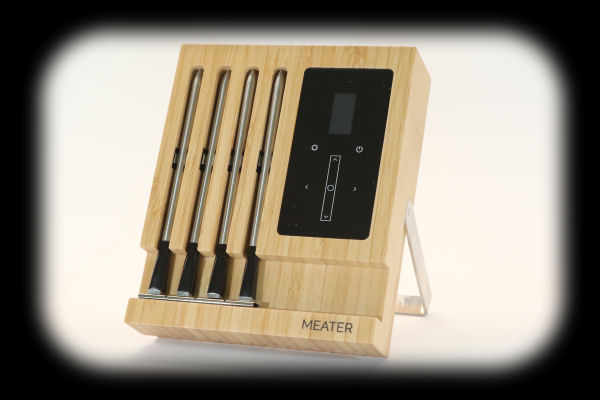
The MEATER Block is a beautifully crafted block of bamboo, a solid product with good application support as
well as customer support. It does everything you would expect of a meat thermometer along with some nice features provided by the application.
It should be immediately obvious to anyone who has cooked with a rotisserie that MEATER products are uniquely suited for constant monitoring of
meat temperature as the meat spins inside a cooker. The predictive cook time feature and the resting time feature should prove to be useful in helping
cooks plan ahead.
The MEATER Block also solves the issue of easy access to the probe data over the internet. When using the MEATER Probe or the MEATER+ Probe, it was somewhat inconvenient to have to leave a second phone or smart device near your cooker if you wanted to be able to monitor your cook on your smart phone from afar (like when you run to the store). This has been nicely solved by the MEATER Block. Of course, to get this additional functionality, you have to accept a higher price since you have to purchase four probes. (The MEATER Block only has the option to purchase the Block with four probes.)
The MEATER Block probes, like the earlier probes, appear to produce higher meat temperature readings than other traditional probes requiring you to adjust your target temperatures from what you might be accustomed to. And as we pointed out in the review, you really can't use the ambient sensor on the MEATER Probe as a substitute for a traditional thermometer on your cooker. The ambient sensor is really there to help the MEATER Probe application predict cook times.
So, the MEATER Block has many pluses and a few minuses, but if you want or need a meat thermometer that is truely wire-free along with remote monitoring capabilities, you should give it a serious look. And now with at least one other competitor out there for comparison, it is now worth noting that the MEATER products are certainly first in class as far as quality and build.
Contact Information
Apption Labs, Inc.
11908 Ventura Blvd. Suite 202
Studio City, CA 91604
Apption Labs Limited
7-8 Westbridge Close
Leicester, LE3 5LW
General Email: hello@apptionlabs.com
Support Email: support@apptionlabs.com
Web: https://www.meater.com
Facebook: https://www.facebook.com/apptionlabs/
You can support this website by shopping at The Naked Whiz Website Store and Amazon.com
|