 |
 |
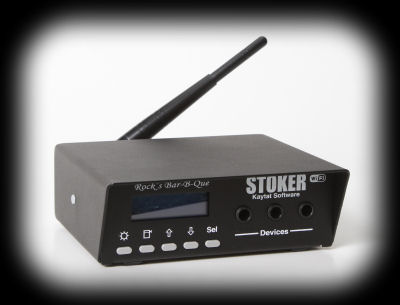
Connecting The Stoker To The Internet This is going to be a long web page, unfortunately, so let's start easy. First, let's talk about connecting the Stoker to the internet via a normal ethernet cable. (Even if you want to use the wireless capabilities, you will have to perform these steps in order to get the wireless working.) The Stoker has an Ethernet connection (an RJ45 jack) on the rear of the unit. In order to connect The Stoker to your PC, you need to have a router. If you have high speed internet service, then you have a cable modem or a DSL modem. If you can connect more than one PC to your high speed connection, you must have bought a router! If not, then you can buy routers for around $50 to $80. The secret here is that a router allows you to connect multiple devices to one high speed connection. It does this by assigning a network IP address to each device you connect to it. That is the magic that you need to hook The Stoker up to your PC. When you plug your Stoker into your router, The Stoker will obtain an IP address from the router that you can then use to communicate with it. Once you have connected your Stoker to the network, you can:
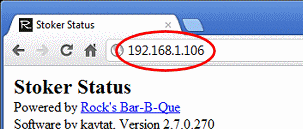
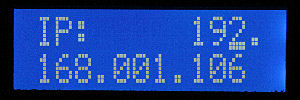 Copy this IP address down and you can then enter it into a web browser on your PC. The Stoker will serve up web pages to the browser on your PC that you can then use to set up The Stoker. You can see below how we have entered The Stoker's IP address into our browser to display its current status:
Using Wifi To Connect Within Your Network Obviously, the big news with the new Stoker Wifi is Wifi! To use it wirelessly, you simply have to connect the stoker Wifi to your home network the same way you would connect a new laptop or a wireless printer. You give the Stoker the name of your network, the password to your network and the type of encryption used on your network. Your first step is to connect the Stoker to your network with a ethernet cable so you can get to the Stoker's Wifi setup web page. You get there by typing in the IP address that you have already determined and appending "/wifi.html" to it in the browser's address window. So, go ahead and do that. We'll wait....... Ok, you there? Here is the Stoker Wifi setup web page:
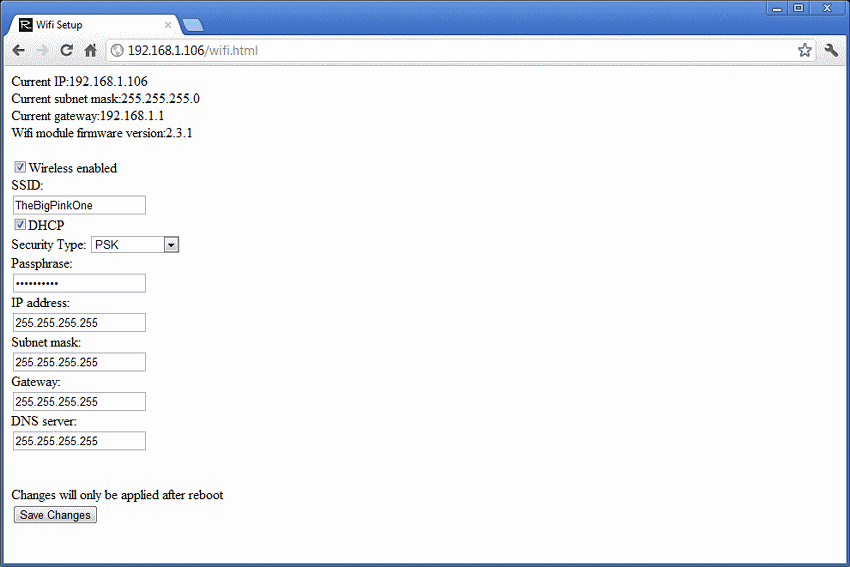 The SSID is the name of your network. The passphrase is the password needed for the router to grant access to your network. You either know it or you are in trouble. If you don't know it, you'll have to consult your router's documentation on how to reset it. Once you reset it, remember it! The security type can be found on Window machines by clicking on the little network icon on the taskbar (see the image below) and then hovering over the entry for your network. In this case, our network is "TheBigPinkOne" and our security type is WPA2-PSK. The Stoker calls this type just "PSK".
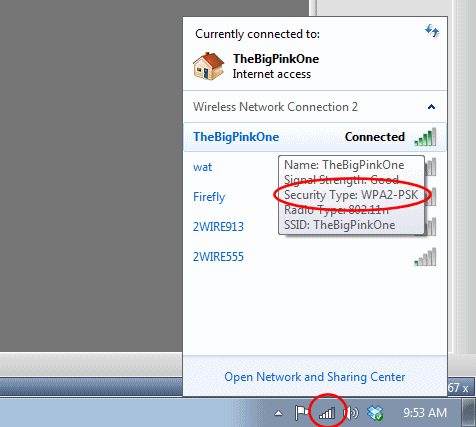 So on the wifi.html screen above you just enter the name of the network in the SSID field, select the security type, enter the passphrase, and make sure that "Wireless enabled" and "DHCP" boxes are checked. Click on the "Save Changes" button, wait for the confirmation screen, power off and on the Stoker, and unplug the ethernet cable. Navigate the Stoker menus to the "Network Wifi IP" item and copy down the Wifi IP address. (It may or may not be the same as the IP address used when you had the cable connection.)

Use this IP address in your browser and you should come up to the main Stoker Status screen like you did with the cable connection. There! You are now able to access the Stoker Wifi wirelessly from any device that is connected to your network. In the next section, we'll show how to connect to the Stoker from a device outside of your home network, such as a smart phone or your computer at work. Connecting From Outside Your Network OK. Take a deep breath. You have connected to your Stoker from within your own network, but you may want to set up your network so that someone outside of your network (perhaps your computer at work) can enter your network with a request to display the Stoker's web page. Normally, there is nothing on your local network that can provide web pages (i.e., a web page server), so routers come preconfigured to not allow that kind of traffic into your network. What we need to do is tell the router that a) it's ok, and b) where the web server (the Stoker) is. The first part is to make sure that the Stoker doesn't change IP addresses. Your router assigns an IP address to the Stoker, but if you turn the Stoker off long enough (the default on our router is 24 hours), then the router will put the IP address for the Stoker back in the free pool, and it may then give it to another device like your smart phone or your laptop. To avoid having the Stoker's IP address change from day to day, you can tell your router to permanently assign an IP address to the Stoker. We'll show you how we did it on our Linksys router. It will be different on different routers, but the function is the same. You just have to figure out what your router calls it. In order to do this, you first need to find the MAC address of your Stoker. The MAC address is a burned-in permanent address that gets set by the manufacturer of every network adapter. Some devices have a label on them listing the MAC address. (We have bought laptops that had this label.) Others don't. But every device has a unique MAC address inside. So, to find the MAC address of your Stoker, first you need to find the IP address of the Stoker. You did this previously when you set the Stoker up to enable Wifi. Navigate to the "Network Wifi IP" or "Network IP Addr" screen (depending on whether you are connected via wifi or cable) to display your IP address:

So far so good. Now, on our router there are two ways to find the MAC address currently associated with 192.168.1.106, directly through the router interface or using the application that came with the router. You may or may not have such an application, but we'll show it first. For our Linksys router, the application is called Network Magic. When you start it up, you can click on the tab marked "Map" to show a map of your internal network. Here we have clicked on the little down arrow for the "AlienWhiz-PC" device to get a menu of options.
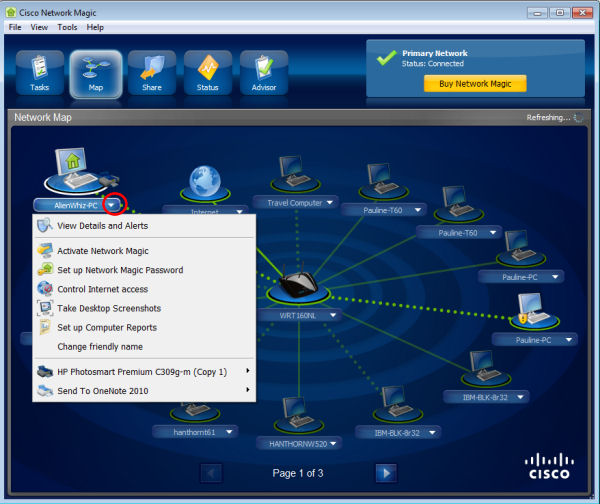
Then you click on the "View Details and Alerts" item to view the information about this device:

So now we just need to find the device on the map that corresponds to the Stoker. So find any active device on the map, click on the information item and look for the device with the IP address that matches your Stoker. Here's what we found:

Now we know that MAC address 00:1D:C9:D0:74:44 is currently associated with IP address 192.168.1.106. Cool. We could have also found this out using just the router itself. The router has a web server built into that allows you to access the inner workings of the router and to make changes to its configuration. Again, this is completely different from router to router, so here is what our router does. Sign into your router by typing IP address 192.168.1.1 into your browser's address window. (This is the default IP address of the router inside your network.)

On Linksys routers, the place you want to go is that button labled "DHCP Reservation". Click on it and you get the following screen:
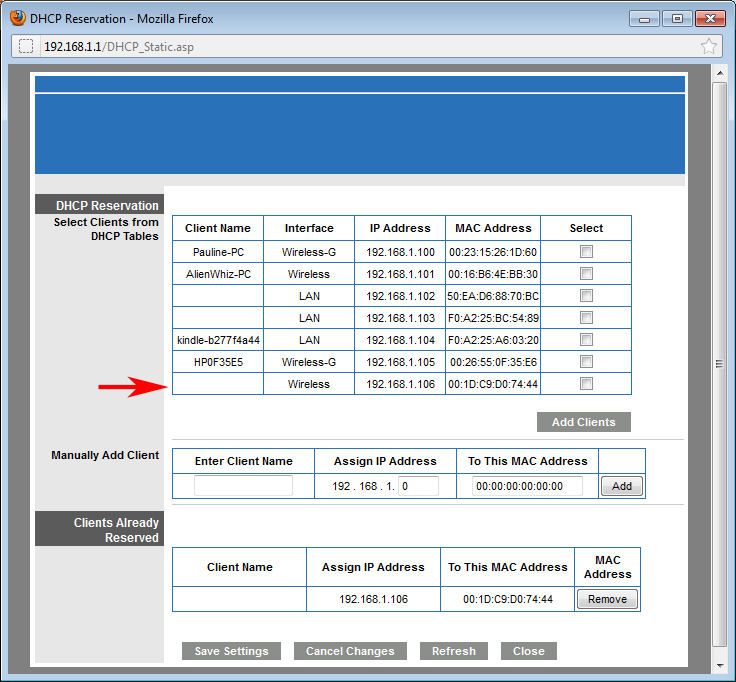
As you can see on the line marked with the red arrow, MAC address 00:1D:C9:D0:74:44 is currently associated with IP address 192.168.1.106. So at this point, you would click on the "Select" box for that line and then click on the "Add Clients" button, and voila! Now your router will always assign IP address 192.168.1.106 to your Stoker. The second part is done with that dreaded phrase, "port forwarding". You don't really need to know anything about ports other than the fact that a request for a web server to provide a web page to someone outside the network will come into your network on port 80. Normally, port 80 is blocked, but we are going to open it up and direct any web page requests that come in on port 80 to go the Stoker. So, we are going to tell the router to forward any messages on port 80 to IP address 192.168.1.106, which is now the IP address that is permanently assigned to the Stoker. To do this, you need to find the "port forwarding" function on your router. It will be called "port forwarding" so all you have to do is find it. On our router it is under the "Applicaton and Gaming" tab:
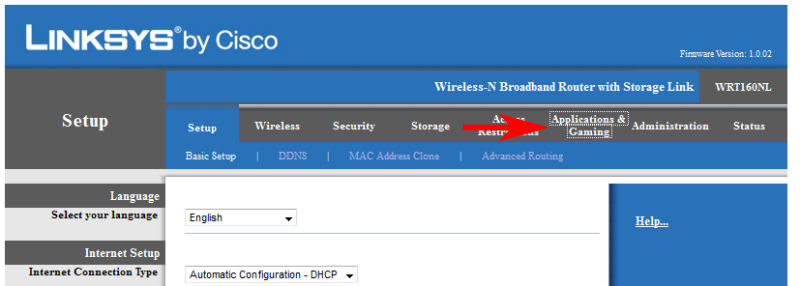
Then click on the "Single Port Forwarding" tab and you will be given the following screen. Notice that on the line for "HTTP", we have entered the IP address of the Stoker and clicked on the "Enabled" checkbox:
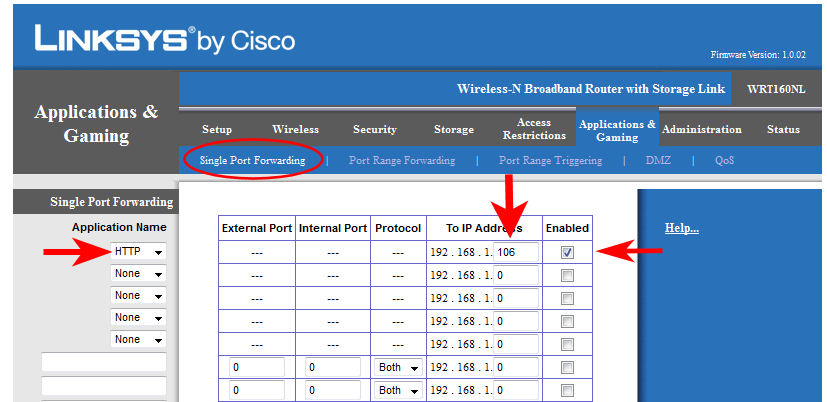
So, now we have done the two things necessary to gain access to the Stoker from outside our network. We have made sure that the Stoker will always have IP address 192.168.1.106, and we have told the router to send any requests for web pages to this same IP address. And take heart. Even if all of this escapes you, if you can find a friend who knows a little bit about home networks and routers, they should be able to take these screenshots and set your router up for you. Now there is only one other thing you need to do. Your router has an IP address assigned to it from your ISP. This is the address that the outside world uses to send messages to your router. Finding it is easy peasy. Just google "IP" and you will get this:

Currently, the external IP address of our router is 174.109.134.122. This is what you would type into your browser address window if you wanted to see our Stoker. (Don't try it. We've changed our IP address.) Now there is one last thing you need to know. Your external IP address probably isn't going to change as long as you leave your router powered on. Our ISP seems to reassign your IP address to someone else if you don't use it for 12 hours. So you can either make sure you check your external IP address before you leave home, or you can use a dynamic DNS service like www.dyndns.com that does some black magic voodo hocus pocus that gives you a web address like "yourname.dyndns.org" which always points to your computer, even when your external IP address changes. A service like this costs about $20 a year. If you use this service then, instead of typing in your external IP address, you would type in whatever name you are assigned by the service. The name never changes so you always know what to enter to get to your Stoker. |
You can support this website by shopping at The Naked Whiz Website Store and Amazon.com
|