 |
 |
|
Temperature Control Hints and Tips ©2004 The Naked Whiz
One of the first things you must realize in using a ceramic cooker fired with charcoal is that you can't just dial in a temperature. You can't turn a knob up to raise the temperature and you can't just turn a knob down to lower the temperature. There are several things to consider in controlling the temperature of your cooker. In the end you will find techniques and settings that work for you, but here are some general tips and explanations of various aspects of temperature control.
We'll go into more detail later on, but here are a few quick guidelines to get you started:
The thermometer you stick in the dome measures the temperature of the air inside the cooker. The temperature of the air is affected by the temperature of the fire, but also by the temperature of the ceramic shell. If the ceramic is hotter than the air inside the cooker, then the ceramic acts as a heat source and adds heat to the air, raising the temperature. If the ceramic is cooler than the air inside the cooker, then the ceramic acts as a heat sink and takes heat from the air, lowering the temperature. The magnitude of the temperature difference between the two affects the speed of the heat transfer and thus the speed of the temperature change.
This is of greatest concern when you want to lower the temperature of your cooker. If the ceramic is hot, it will be very difficult to lower the temperature because the ceramic will continue to heat the air, even if the fire does not. (This is how brick bread ovens work. They build a fire in it to heat the brick, then they pull all the ashes out and bake for several hours just from the heat of the bricks.) If the ceramic is not yet hot, then you will have little trouble in lowering the temperature.
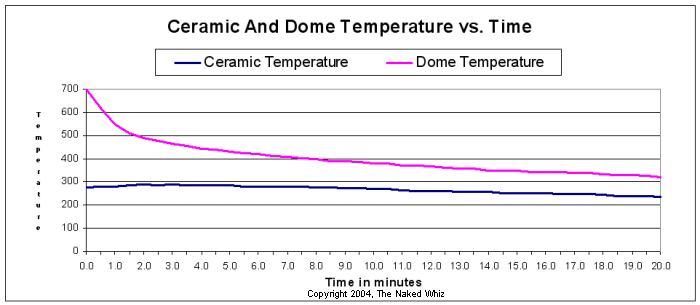
The following graphs demonstrate the effect of the temperature of the ceramic on the temperature of the air. Two tests were conducted. In the first test, the cooker was started from cold and allowed to heat up until the air temperature measured by the dome thermometer was 700 degrees F. At that point, the air vents were shut and the temperature of the air inside the cooker and the temperature of the ceramic shell were recorded at 30-second intervals. The temperature of the ceramic was taken on the dome next to the dome thermometer using an infrared thermometer. The ceramic temperature was 160 degrees F when the vents were shut down:

Temperature of the air vs. the temperature of the ceramic with a starting ceramic temperature of 160 degrees F. In the second test, the cooker was allowed to stay at 700 degrees F for several minutes until the ceramic had reached a temperature of 275 degrees F:

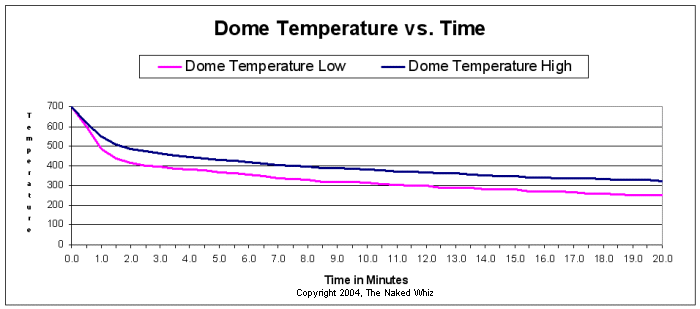
Temperature of the air vs. the temperature of the ceramic with a starting ceramic temperature of 275 degrees F. Notice the difference this makes when you chart the air temperature from the two tests:

Temperature of the air with a starting ceramic temperature of 160 and 275 degrees F. From about two minutes onward, the air temperature stays about 80 degrees hotter with the ceramic at a higher temperature than at the lower temperature. As you can see, it would have taken at least another 15 minutes for the air temperature of the hotter cooker to drop down to the 250 degree mark that the cooler cooker reached at 20 minutes. If you would like some anecdotal information, our first low and slow cooking experience detailed here in Our Beginner's Guide To Making Pulled Pork demontrates how the temperature will easily come down if the cooker shell is cold. Basically, we dumped a chimney of roaring hot lump on top of the charcoal that we had prepared for an overnight cook. We closed the lid and the temperature of the cooker zoomed up to 400 degrees. However, by closing the vents down and adding my plate setter, drip pan, grid and pork butt to the cooker, the temperature dropped to under 200°F. Had we let the ceramic shell heat up, this would not have been possible.
There are lots of different things that can affect the temperature in your cooker. In no particular order:
Ok, this one is a little off the wall, but it goes to the heart of the fact that you need
to allow the fire, the ceramic, the food, etc. reach an equilibrium before you will have
a stable temperature. One thing that can affect the stability of your fire's temperature
is whether or not the fire is at the maximum size it can be for the amount of air being let into the
cooker.
A fire is a chemical reaction which proceeds at a certain rate, but the size
of the fire (or of the reaction) depends on how much of the reactants are available
to the reaction. For example, let's make up some absurd numbers just for illustrative
purposes. Suppose that 1 unit of air combines with 1 unit of fuel per second to yield
1 unit of heat.
(We're pretending here. Play along...) You've got 17 gazillion units of fuel in your
cooker because you have loaded it up with charcoal. Let's say you have 1000
units of air entering the cooker per second, available for combustion. However,
let us also suppose that your fire is still very small and that it is only using
500 units of air per second. So, the other 500 units of air are going through
the cooker unused.
Under these circumstances the fire is going to spread until it is big enough to use
1000 units of air. Thus the amount of heat is slowly going to increase from 500 units
to 1000 units as the fire spreads and gets bigger. If your target temperature requires
only 750 units of heat, this is bad. And if the fire is spreading very slowly, you may
think you have a stable fire and temperature, but over time, the temperature will slowly creep up.
We realize that this is almost certainly an oversimplification of the whole fire in a cooker
thing, but we hope you get the gist of it. Until you reach an equilibrium, the cooker's
temperature won't be stable over a long period of time.
For searing steaks, there is nothing like a raging hot charcoal fire in a ceramic cooker.
Here are some tips for getting to the highest temperatures:
This is a controversial topic for some, but not for others. If you want automatic temperature control, then you
should look into a product called The BBQ Guru. There are a couple of different
models with different features, so you should visit their website for serious information. However, the basic
function of The BBQ Guru is to control the temperature of your cooker between 175 and 400 degrees. It has a temperature
probe that you put inside the cooker. The probe feeds temperature data to a small electronic controller. You dial the desired temperature into the controller and the controller in turn then controls a fan which attaches to the lower vent of your cooker. When the temperature is lower than your target, the controller turns the fan on which blows air into the fire and causes it to heat up. As the controller senses that the temperature of the cooker is rising and approaching your
target temperature, it begins to cycle the fan off and on. Eventually things reach an equilibrium where the controller is pulsing the fan on for short periods of time, keeping the temperature right where you want it.
Another fancier model has a second temperature probe which is used to monitor the temperature of the meat. This allows the BBQ Guru to implement a function called "Ramp Mode". What is ramp mode? Here's an example. Let's say that you are going to cook a brisket at 225 degrees until the meat reaches 190 degrees internal temperature. You dial in a meat temperature of 190 and a cooker temperature of 225. While the meat is cooking, The BBQ Guru will keep the cooker temperature at 225 degrees, as you would expect. However, once the meat temperature starts to get close to 190 degrees, The BBQ Guru starts to let the cooker cool down, slowly dropping the temperature until the cooker temperature and the meat temperature both reach 190 degrees. At this point you can leave the cooker and the meat until you are ready to take the meat out of the cooker. The BBQ Guru will keep the meat at your desired temperature of 190 degrees. Perhaps a graph will make this clear:
 The most obvious benefit of The BBQ Guru is to let you sleep when you have an overnight cook. You don't have to worry about the fire going out or getting out of control. The BBQ Guru does that for you. Low and slow becomes easy peasy. You may have mastered low and slow overnight cooking and not need the BBQ Guru or want to spend the money on one. However, many people find the convenience and worry-free nights of sleep a real plus. Only you can decide.
There's another barbecue temperature controller on the market, The Stoker, which comes to us from Rock's Bar-B-Que. What's new with The Stoker is the ability to control multiple cookers with one unit (with the addition of more temperature sensors) and the ability to control The Stoker over the Internet. Here is a link to our review of The Stoker.
Since we originally wrote this article, there has been an explosion of temperature controllers on the market. As of this writing, we have reviewed 29 different brands/models. Here's a link to all of our reviews: Reviews of Temperature Controllers. |
You can support this website by shopping at The Naked Whiz Website Store and Amazon.com
|