 |
 |

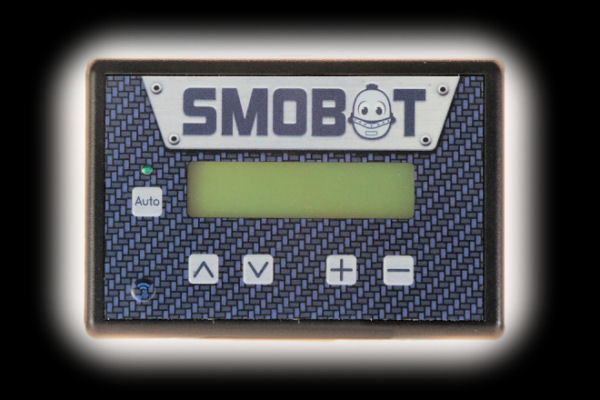
The display is a 2x16 LCD display with backlight. The backlight can be set to “BRITE” which is always on and full-brightness, “DIM” which is always on but half-brightness, or “OFF” which will be off unless you push a button. When a button is pressed while the backlight is set to OFF, if will momentarily illuminate at a dim power so you can read the display in the dark if needed. Battery life will be noticeably impacted by your choice of backlight setting. Here is the screen that displays while the SMOBOT is operating:  One other note about the display itself. There are settings in the menus for adjusting the contrast and brightness/behavior of the LCD display's backlight. We'll get to that down below. Now let's take a look at the various displays in detail.
The ⋀ and ⋁ buttons move you up and down the menu of items, and the + and - buttons allow you to select options and change values. While you scroll through the menu of items, you will notice that there will be a solid square in the first position of one of the lines. This indicates that the line with the solid square is the currently selected item, and that you can alter the value of that item with the + and - buttons. In the following example, the WiFi option is currently selected and can be turned on and off with the action buttions:
 So using the ⋀ and ⋁ buttons, you can scroll through the following menu items:
All the connections are on the two ends of the system unit. In addition to the sockets for power, damper and temperature probes, you can see a small button to the left of the power socket. Pushing this button will produce a hard reset:
The SMOBOT controller is powered by 5V DC. It comes with a power adapter that can be used with 100-240V AC. (Should your power adapter go bad, you can use practically any 5V micro-USB power adapter.) Also provided is a 40" micro-USB cable. You can also power the SMOBOT using a 5V USB battery pack.
One word of caution regarding using USB battery packs. Some battery packs will shut off if they don't detect sufficient current being drawn for a sufficient period of time. Needless to say this will turn off your SMOBOT. There really is no way to tell if any particular battery pack will behave this way, so you may wish to ask fellow SMOBOT owners which battery packs they are using. If you should find that your battery pack is turning off, you can try turning on the "WiFi AP" option in the menus. This will cause the SMOBOT to draw more current and it may keep your battery pack active. Of course, that will mean your battery pack won't last quite as long.
For what it's worth, at the time of this writing we have been using an
ExpertPower 10000mah Slim Fast Charge 3.0 External Battery Pack The SMOBOT controller comes with one pit temperature probe and two food temperature probes.
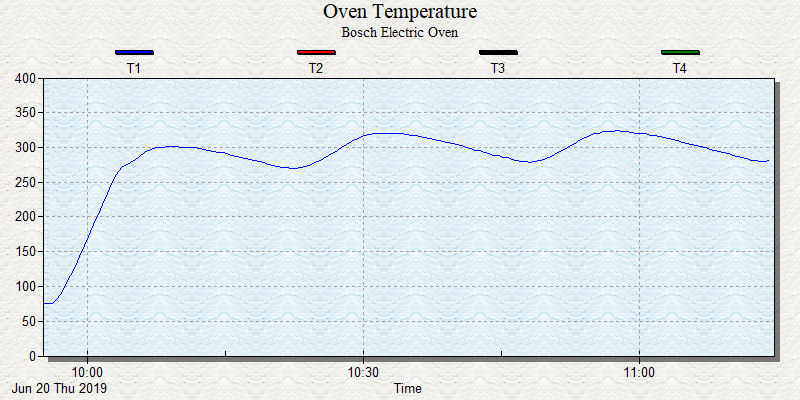
The probes are made from stainless steel. Each probe has a 58" cable. The pit probe contains a thermocouple and the cable is made with high temperature fiberglass insulation good for sustained exposure to temperatures up to 900°F (482°C). An alligator clip is provided with the pit probe which you can use to clip the probe to your dome thermometer or the food grid, as you see fit. The food probes contain thermistors and have braided steel cables. They are waterproof and rated for temperatures up to 716°F (380°C). The probes and the wires should be shielded from direct radiation from a hot fire. Do not let it come into direct contact with flames. If you need to shield the wire, you can place a layer of aluminum foil beneath it. Also, having the pit probe itself exposed to direct radiant heat can cause it to register a temperature which is higher than the air temperature in the cooker, and thus fool the controller into cutting back on the fire. (If a pit probe does fail, you will be able to tell because when plugged into the controller with no heat applied to the probe, the controller display will show two asterisks instead of a numeric value.) How accurate are the probes? We measured the temperature of boiling water using the SMOBOT controller. Using our boiling point calculator to determine the boiling point of water in our locaton, the two food probes were spot on, within 0.5°F. The pit probe was not quite as accurate, missing the actual temperature by -3.5°F. Frankly, this is really isn't a concern, since that is more than enough accuracy to control the temperature of a cooker. And compared to the 50° swing that is typical of most kitchen ovens, 3.5° is a tiny blip. How tiny? Well here is how well our $2200 Bosch oven holds 300°F:
 That's a 43°F swing on the last oscillation. Again, a 3.5°F error on your pit temp is irrelevant. There is no calibration procedure for the pit or food temperature probes. |
You can support this website by shopping at The Naked Whiz Website Store and Amazon.com
|