 |
 |

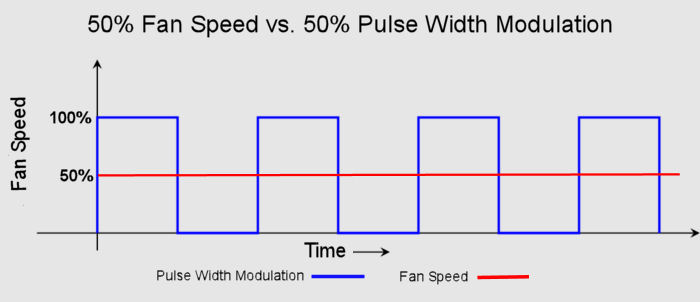
The Auber Instruments SYL-3615 controller will remember the target pit temperature if power is lost so that it can resume control of the cooker's airflow when power resumes. (The same is also true if your controller loses its Wi-Fi connectivity to your smart device.) These are features implemented first by BBQ Guru (Ramp Mode) and then by Flame Boss (Keep Warm). Ramp mode will lower the cooker temperature once the meat gets close to being done. As the meat temperature rises closer and closer to the target meat temperature, the controller continues to lower the cooker temperature. Ultimately, when the meat temperature reaches the target temperature, the cooker will also be at the meat target temperature. Keep Warm simply drops the pit target temperature to a selected value as soon as the meat temperature reaches the target temperature. In both features, the goal is to allow you to hold your cooker and meat at the meat's final target temperature should you not be available to immediately see to it. After that lengthy explanation, we'll just say that the Auber Instruments SYL-3615 controller does not implement a function to hold your meat at a certain temperature. However, using it's programming function, you can probably devise a program to accomplish this. The Auber Instruments SYL-3615 controller will allow you to set a pit target temperature as low as -99°F, so in theory, it can control your cooker as low as your cooker can go. Of course, the ability of the controller to actually control your cooker at low temperatures will depend on your cooker and how airtight it is. The Auber Instrument SYL-3615 unit uses a PID control mode as the default. What's PID? Here's what is in Wikipedia: "The PID controller calculation (algorithm) involves three separate parameters, and is accordingly sometimes called three-term control: the proportional, the integral and derivative values, denoted P, I, and D. [...]these values can be interpreted in terms of time: P depends on the present error, I on the accumulation of past errors, and D is a prediction of future errors, based on current rate of change. The weighted sum of these three actions is used to adjust the process via a control element such as the position of a control valve or the power supply of a heating element."A little more reading reveals that it is used in feedback loop methods which turn out to be a pretty good method of controlling a process when you don't have good knowledge about the process itself. Obviously, the controller doesn't know how big your cooker is. It doesn't know how airtight your cooker is. It doesn't know how much charcoal is in your cooker. There are a lot of unknowns, so this feedback loop method allows the controller to accurately control a wide variety of cookers in a wide variety of environments. The bottom line is that this controller can use PID control to control your cooker which will allow it to gradually learn your cooker. It also allows you the user to actually modify the parameters used by the unit's algorithm. There are four parameters, P (Proportional), I (Integral), D (Derivative), and T (Control Cycle Time). You can save and recall up to 6 different sets of PID parameters through the Control Settings menu. If you want to play with these settings, you can save them in one of the 6 allowed sets and if necessary, recall the original set of parameters should you find yours are not working well. That said, we can't begin to explain to you how to modify these parameters. We will be using the default algorithm with the default parameters. If you find yourself wanting or needing to explore this further, you should probably contact Auber Instruments support. You can also find Auber Instruments' explanation of PID parameters in the Instruction Manual for the SYL-2615, which is available on their website. So we have just explained that the Auber Instruments SYL-3615 controller can use its PID algorithm along with an appropriate set of PID parameters to control your cooker or you can manually control your cooker. Of course, you control your cooker by controlling how the fan works. You can either control the speed of the fan, or you can turn the fan on and off. When you turn the fan on and off you are using something called Pulse Width Modulation (PWM). Turning the fan on and off is pulsing the fan. Changing the length of time that you turn the fan on is controlling the width of the pulse. So for example, if you are using PWM of 20%, you would turn the fan on for 2 seconds and off for 8 seconds. The pulse is 20% of each 10-second cycle. In contrast if you control the fan speed, setting a fan speed of 20% means that the fan will operate at 20% of its maximum speed at all times and never turn off. Here's a graph showing the difference between setting a fan speed of 50% to using 50% Pulse Width Modulation:
 So you have a choice of four control modes:
NOTE: Auber Instruments calls its manual and PID PWM control modes "MAN TP" and "PID TP" in the App and in the controller screens. You should be aware that if you change the control mode in the middle of a cook, the controller will be reset and you will lose all your cook data up to that point. How To Set Manual Control Modes If you choose one of the two PID control modes, you don't have to do anything, just let the PID algorithm take control. If you choose one of the two manual control modes, you have to set the PWM or fan speed percentage. To set the percentage for either manual control mode, all you have to do is tap on the percentage bar for the blower:
To set the control mode percentage on the controller:
Which Control Mode Should You Choose? Which should you choose? Well, unless you have a special situation you should choose one of the two PID control modes. If you choose PID PWM, the blower is going to blow at 100% on and off which may blow excessive ash into the air of your cooker. If you choose PID Fan Speed, the blower may be asked to run at extremely low speeds sometimes, and some blowers don't perform well at such low speeds. Auber Instruments provides the following recommendation: "In general both PWM and FS modes produce similar control performance when the same PID parameters are used. However, each mode has its own advantages for a specific system. (Editor's note: Nope! See our comments following this information from Auber Instruments.)That's all fine and well, but based on our testing, PID TP (PWM) is a lousy choice for Kamado cookers due to the poor control we observed. When doing some cooking for this review, we started out using PID TP on our large BGE that had been stabilized at 350°F. The unit never gained control of the temperature creating up and down swings of 70°F! We changed to PID FS control and the controller immediately took control and after 15 minutes, the temperature swings were down to a few degrees. Clearly, we recommend you choose PID FS for the control mode. Open-Lid Detection is a feature where the controller detects the rapid drop in temperature caused by opening the lid. It stops the blower to prevent stoking the fire unnecessarily and then manages the rise in temperature after the lid is closed. Some controllers detect open and closed lids without any input from the user. Some let you configure a specific length of time for the blower to be turned off. The Auber Instruments SYL-3615 controller allows you to enable or disable Open-Lid Detection. Here's how you enable Open Lid Mode on the AuberWiFi App:
We'll show you how the Open Lid Mode feature performed later in the review. There is no built in timer function on the Auber Instruments SYL-3615 controller where you can set a timer and get notified when it expires. However, there is the option in their programming function to have cooking steps end based on a timer. From time to time, the firmware in your Auber Instruments controller may need to be updated. The controller can check for the availability of newer firmware levels when it connects to Wi-Fi. This ability can be turned on or off in the System Configuration. The default is OFF. However, if you enable the function and a firmware update is available, the unit will install the new level. Here is how to request a firmware update from the AuberWifi App:
Within a few seconds, your controller should either display "your device is up to date" (most likely) or begin installing a new level of firmware. Note that you can also request a firmware update through the menus on the controller itself:
The Auber Instruments SYL-3615 controller has a feature that here to now has only been available on Fireboard temperature controllers, and that is the ability to program the controller with multiple cooking steps. Auber Instruments calls this a "Cooking Profile". You can create a cooking profile either on the controller itself or by using the App. The default setting is to have a cooking profile that consists of a single step. This single step tells the controller what pit temperature to maintain, and that step never ends. To alter the target pit temperature, you go into the profile and modify the pit temperature in this single step. In order to use a multi-step profile you must enable "Multi-step program" in System Config. Once you have done this, you can create up to six steps for a cooking profile. For each step, you specify:
|
You can support this website by shopping at The Naked Whiz Website Store and Amazon.com
|