 |
 |

The SYL-3615 comes with 3 temperature probes. A pit probe (WS-SENSOR17) and a meat probe (WS-SENSOR18A) are provided, and you can choose between a second meat probe or a fish/sausage probe (WS-SENSOR22) for your third probe. (The fish/sausage probe is shorter and of smaller diameter than the meat probe, and is intended to be used for smaller or more delicate pieces of food.) All three probes are PT1000 Platinum Resistance Temperature Detector (RTD) probes. They all have 6 foot (1.8m) cables that have floropolymer (Teflon) insulation with stainless steel overbraiding, except the last 12" of the fish/sausage cable is lighter and more flexible than the other two probes, lacking any stainless steel overbraiding. And all three probes have a 3.5mm molded connector. None of these probes are waterproof.
We need to probe (get it?) a little deeper into this fish/sausage probe as it is unlike any probe we have ever seen before on a BBQ temperature controller. The plug and the main cable is exactly the same as the pit and meat probes. However, the last 12" of the cable is a very thin pair of wires without the stainless steel braiding. In the three photos below from left to right you can see the overall probe, the junction between the main cable and the last 12" of the cable, and finally the probe itself. The idea of this probe is that the last 12" of the cable are lighter and more flexible than the regular probes. The probe itself is thinner. In this way, you can insert this probe into a delicate piece of fish, for example salmon, without the probe wanting to fall over or getting pulled out by the weight of the cable. Needless to say, this probe is rather delicate and vulnerable to excess heat, as you can see in the next paragraph.
The temperature range for the Pit and Meat probes is either -99 – 650°F (-99 – 350°C) or -99 – 720°F (-99 – 380°C). The Auber Instruments website states both ranges. The temperature range for the fish/sausage probe is -99 – 400°F (-99 – 204°C). As with all probes, the sensor and the wire should be shielded from direct radiation from a hot fire. Do not let them come into direct contact with flames. If you need to shield the wire, you can place a layer of aluminum foil beneath it. Also, having the pit probe itself exposed to direct radiant heat can cause it to register a temperature which is higher than the air temperature in the cooker, and thus fool the controller into cutting back on the fire. As we mentioned, the probes are platinum RTD sensors. RTD sensors are essentially resistors that vary their resistance in response to temperature changes. RTD sensors have many advantages.
Using our boiling point calculator to determine the boiling point of water in our location (211.5°F), we then measured the temperature of boiling water, an insulated ice water bath, and room temperature with each of the probes as well as a Thermapen ONE:
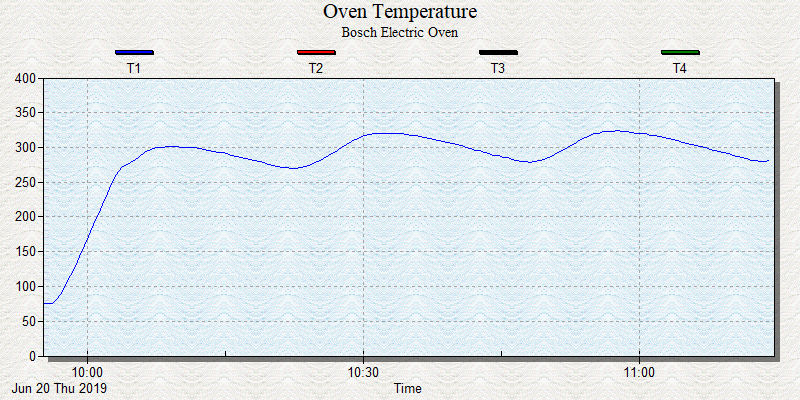
As you can see, all the Auber Instrument probes were consistent with each other, but as you can also see, they were consistently wrong. The Auber Instrument probes consistently read about 4.0°F below the correct reading. While this is probably not a concern when cooking barbecue, they really should be more accurate. We can obviously set an offset for each probe of 4.0°F (see the next section), but we certainly shouldn't have to. That said, when you look at the accuracy that is typical of most kitchen ovens, you'll find up to a 50°F temperature swing. In this light, 4.0°F is a tiny blip. How tiny? Well here is how well our $2200 Bosch oven holds 300°F. That's a 43°F swing on the last oscillation. Again, an error of a few degrees on your temperatures is probably nothing to worry about:
 You cannot actually calibrate any of the temperature probes for the Auber SYL-3615. However, you can go into the System Configuration and enter an offset for each of the probes. Except you don't actually configure the offset for a probe, you configure the offset for a socket. If you unplug your probe and plug it into a different socket, your reading will now be altered by the offset for that socket instead. So if you think a probe is reading wrong and if you want to force it to read what you want it to read, you can enter an offset for the socket it is plugged into. However, you must remember to always plug that probe into that same socket forevermore. Now let's take a look at the blower used by the Auber Instruments SYL-3615 controller. The blower that comes with the large Big Green Egg kit is rated at 6.5 CFM which should be more than enough for most home cookers. (They have larger blowers available with kits for other cookers.) The blower has a built-in damper which automatically shuts when the blower is not operating. It also has a spring clip mounting system that allows the blower to be mounted on any cooker with a suitable hole. For kamado-style cookers, a mounting plate can be used.
As we stated above, the blower has a built-in gravity powered damper. Since it is gravity powered, the blower must be installed with the air intake facing downward. Here are a couple of photos down the throat of the blower showing the damper in the open and closed positions.
Auber Instruments has mounting options for Big Green Eggs, Weber Smokey Mountains, Kamado Joes, Pit Boss Grills, Primo Grills, Vision Grills, Drum and Offset Smokers and other types of cookers. They all involve using the spring clip on the blower holding the blower tight against a plate or the side of the cooker. We will be looking at the option for a large Big Green Egg. The kamado adapter fits into the grooves in the lower vent of your cooker. If you want to use it on a round cooker like Big Green Egg, you will need to gently bend the adapter so it can accomodate the curve in your cooker. You will want to adjust things in order to obtain as airtight a fit as possible. (Air leaks will make it difficult to control the temperature of your cooker.) The kit for a large Big Green Egg comes with an adapter plate and silicone gasket. Since you may need to bend the plate slightly to fit the curve of the Big Green Egg, the gasket allows you to maintain an airtight seal.
To mount the blower, first you slip the gasket over the spring clip. Next you slip the metal mounting plate over the spring clip. The second photo shows the blower in the correct position for mounting, with the air intake down. Also notice that the bent edge of the plate is to the right in the photo, and the edge bends towards the cooker. The photo on the right shows the blower correctly mounted on a large Big Green Egg.
The Auber Instruments SYL-3615 controller has a beeper in the control unit that can sound for alarm conditions. When the beeper is sounding, it can be silenced by pressing the DOWN button briefly on the controller. You can also configure the beeper not to sound at all in System Config. The nature of the alarm is also displayed on the control unit's display. Alarms will sound for the following conditions:
You can effectively disable these alarms by setting the high alarm values to 999° and the low alarm value to 0°. In addition to the controller buzzer sounding for alarms, you can enable having these alerts pushed to the App on your smart device. Notifications about the steps in your cooking profile can also be pushed to your smart device. However, the only alerts you will receive are in-app notifications on your smart device. The Auber Instruments SYL-3615 App does not send text messages or emails. Here is an example of what an alert looks like on a smart device:
You may remember that the original BBQ Guru Competitor had a "Good Neighbor Feature" which allowed you to disable the alarm so as not to disturb your neighbors. The Auber Instruments controller has the option to disable the audible alarm in the System Config screen. Individual alarm events can be silenced by briefly pressing the DOWN key on the controller. The current output of the blower is displayed on the controller itself with the green LED:
 Also, the blower's state, expressed as a percentage, is shown in the AuberWiFi App on the cooker's summary page:
 In addition, the little blower icon next to the percentage will rotate and it's speed will vary to reflect the blower speed. Knowing the blower speed and percentage is useful for knowing what's going on in your cooker. If the pit temp is rising and the blower is off, you may have too much ambient air flowing through the cooker. If the pit temp is falling and the blower is running constantly, you are probably running out of charcoal. |
You can support this website by shopping at The Naked Whiz Website Store and Amazon.com
|
.