 |
 |
The App
The MeatStick has an App for iOS and Android, and the App underwent a major
update when the WiFi Pro Set was released. Since then, there have been some
minor cosmetic changes, so the actual App my vary slightly from what we
show you. Here are some of the highlights of the App:
| Main Screen | Shows a list of probes that are on and connected. |
| Info Shown on Probe List | Cook name, food, food target and ambient temperatures, time remaining, total cook time, probe battery status, Bluetooth connection status, temperature units. |
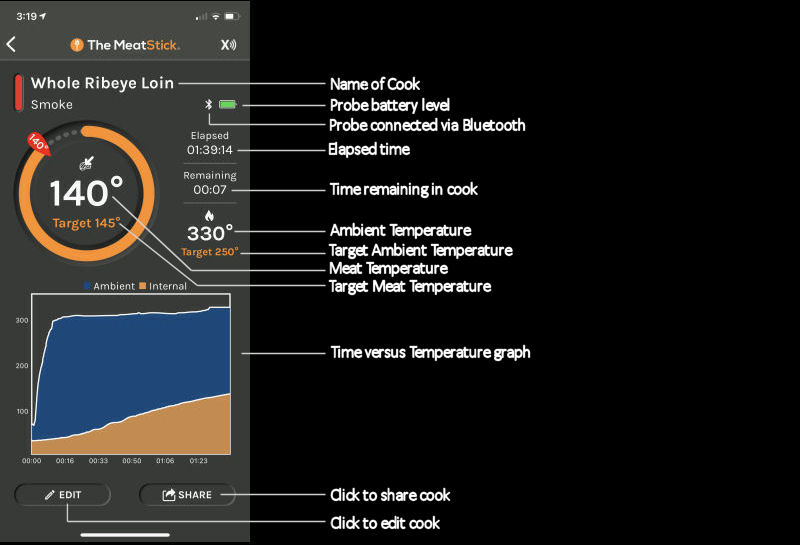
| Info Shown on Cook Screen | Cook name, food and food target temperatures, ambient and ambient target temperatures, elapsed time, time remaining, graph of temperatures, probe battery status, connection type, link to share cook, link to edit cook. |
| Cook Modes | Grill, Oven, Stove, Smoke, Sous Vide, Deep Fry and Quick Start |
| Types of Meat | Beef, Pork, Fish, Poultry, Lamb and Plant-Based |
| Modify Cook In Progress? | Yes |
| Alarms | Meat early warning, meat done, ambient low and high alarms |
| Temperature Graph | Yes |
| Cook History | Yes |
| Share Cooks | Yes |
| Access to raw cook data | Yes |
| In-App Help | Yes. First time use gives you quick tour of many features. |
The Now Cooking Screen: The main screen in the MeatStick App is the "Now Cooking" screen. On this screen you will find an entry for each active MeatStick probe. Of course, on your smart device you will probably need to scroll up and down to see all the probes. Each entry contains information about the current status of each probe.
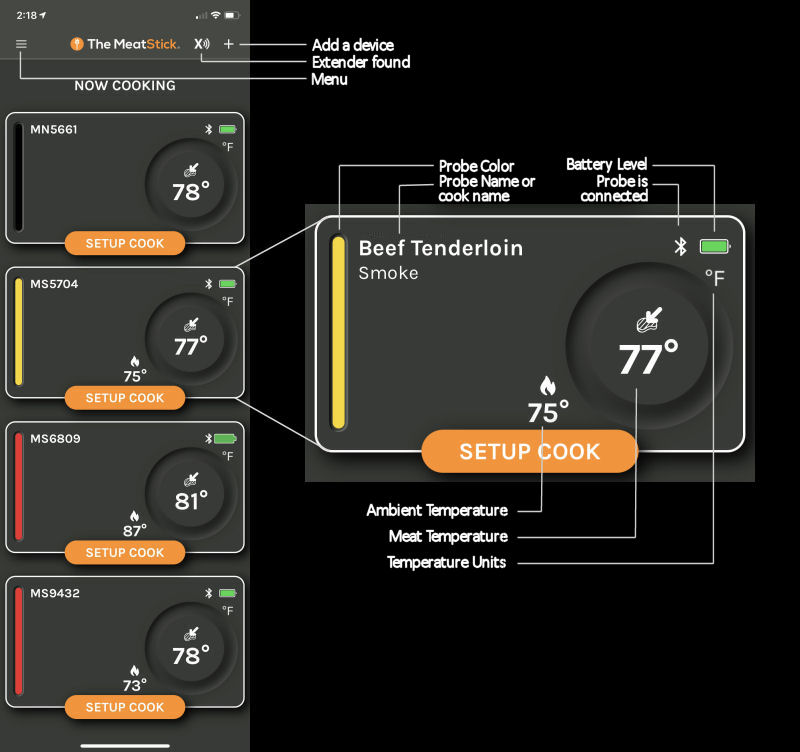
The Cook Screen: If you have set up a cook for a probe, you can click on that probe's entry on "Now Cooking" screen and be taken to the cook screen for that probe.
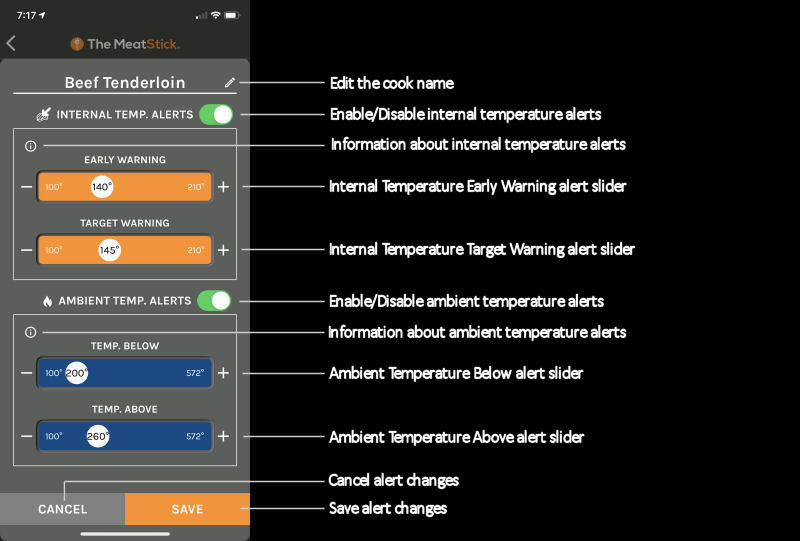
The Edit Cook Screen: If you are viewing the cook screen for a probe, you can click on the "Edit" button and be taken to this screen. Here you can change cook name, the meat temperature alerts and the ambient temperature alerts, or you can disable alerts altogether.
Starting The Cooking Process: In order to start the cooking process, you must select the probe that you wish you monitor, a cooking method, the type of meat and the cut of meat. The App will suggest temperatures for you, but you can alter them if you like. You can also set alert temperatures. Once you start the cooking process, you can then monitor the cook and see a graph of the temperatures over time.
Note that the MeatStick process has no direct provision for resting time. However, you can set two alerts for the food temperature. One is obviously when the food temperature hits the target temperature. However, the one can be used to aid you in resting the meat. It's called the Early Warning Alert. If you set this alert to the temperature that you wish to remove your meat from the cooker, you can then let your meat rest until it reaches the target temperature. Here's how you start a cook:
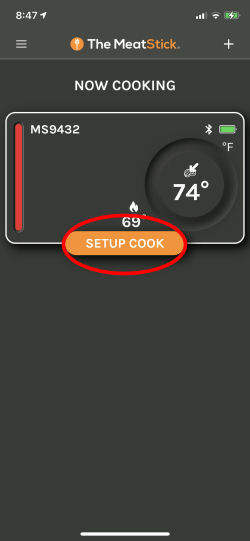 Step 1. From the "Now Cooking" screen, find the entry for the probe you will be using for the cook and click on the "Setup Cook" button. |
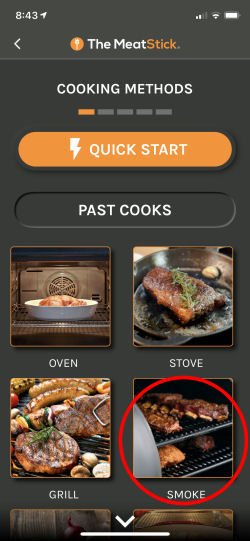 Step 2. Select either "Quick Start" or a cooking method. We'll choose "Smoke". |
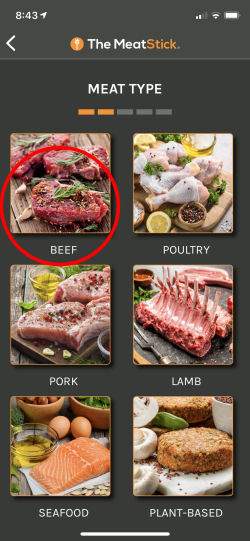 Step 3. From the next screen, choose the meat type. We'll choose "Beef". |
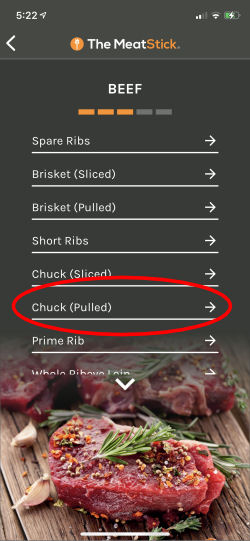 Step 4. Next you must choose the cut of meat. We have chosen "Chuck (Pulled)". |
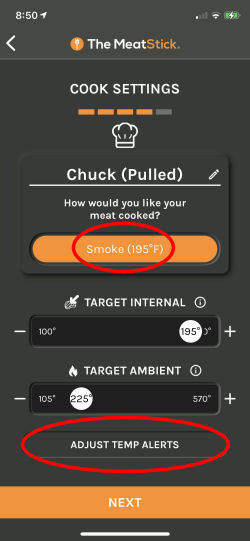 Step 5. You are next presented with this screen. You can adjust the suggested temperatures for the meat and the cooker. You can click on the top orange button to select the level of doneness you wish. This only appears for certain cuts like steak. Otherwise, you can click on the "Adjust Temp Alerts" button to set your alerts. |
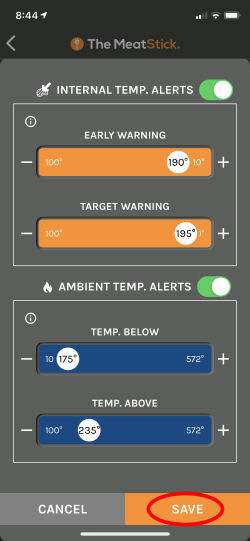 Step 6. You will be taken to this screen to adjust alerts. You might want to set the "Early Warning" value to your meat's target temperature minus the carryover amount. This will let you pull the meat early and let it rest the appropriate amount of time. Then click "Save". |
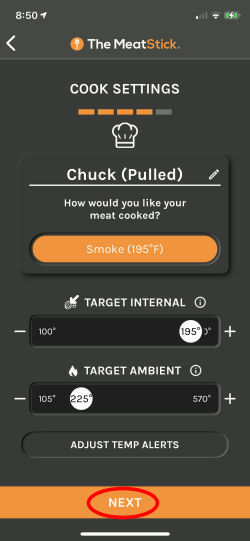 Step 7. You will be returned to the "Cook Settings" screen where you can click on "Next". |
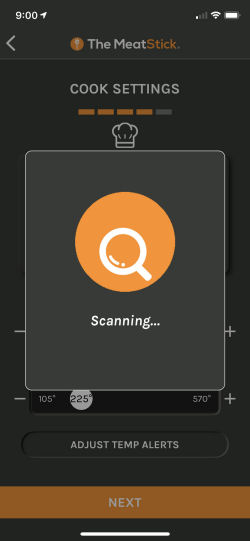 Step 8. The App will scan for your probe and then.... |
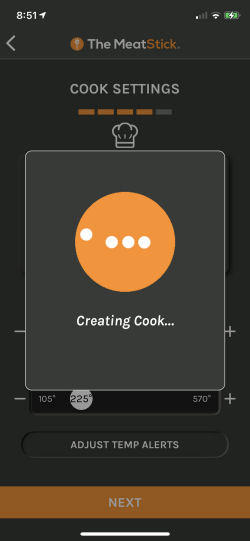 Step 9. ....the App will create your cook. |
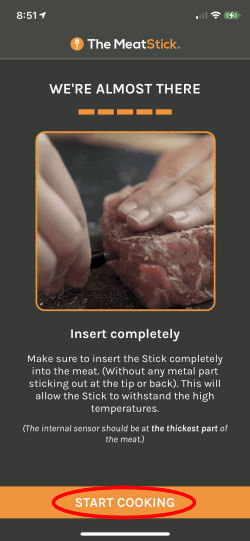 Step 10. You will be reminded to insert the probe completely into the meat and then you can click on "Start Cooking". |
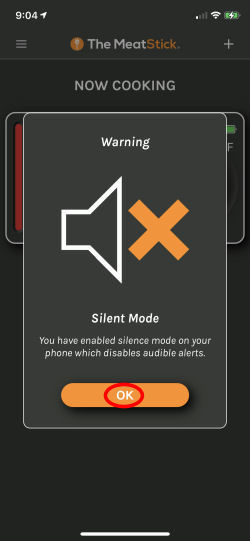 Step 11. If your phone is on Silent Mode, the App will remind you that you won't get audible alerts unless you turn audible mode back on. Click on "OK". |
 Step 12. You are now cooking! You are returned to the "Now Cooking" screen which lists all your active probes. |
During The Cooking Process: During the cooking process, you can monitor the progress of the cook on a graph, see the elapsed time and the remaining time, get a warning when the meat is close to done, and get a warning when the meat's internal temperature finally reaches your target temperature.
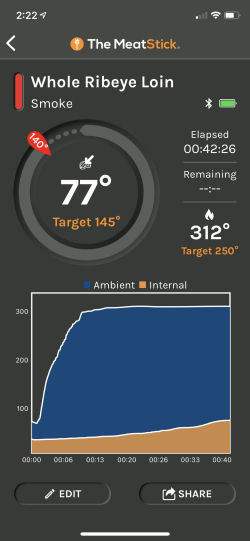 Step 1. If you click on the probe's entry on the "Now Cooking" screen, you will be taken to this screen where you can see everything about the status of your cook. |
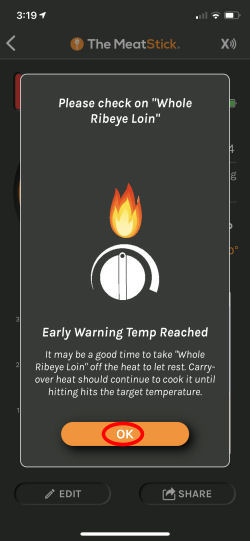 Step 2. When the meat reaches the "Early Warning" temperature, you will get this alert. You can use the "Early Warning" alert to know when to remove the meat from the cooker and let it rest, allowing carryover to raise the meat's temperature to the final target value. Click on "OK". |
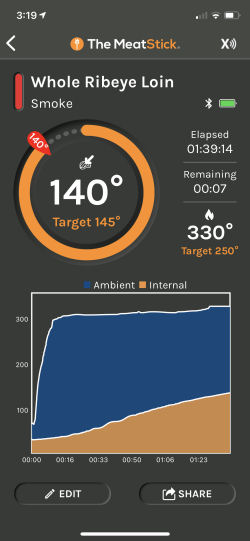 Step 3. You can continue to monitor your piece of meat from this screen until it reaches its target temperature. |
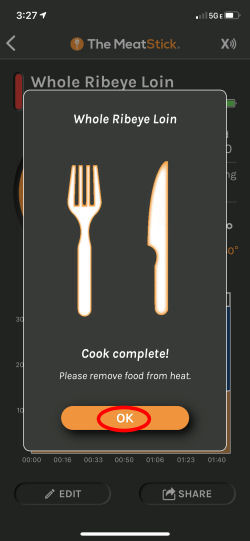 Step 4. When your meat reaches the final target temperature, you will get this "Cook Complete" alert. You are done! Click "OK" to remove the alert. |
Ending The Cooking Process: Ending a Cook is as simple as going to the "Now Cooking" screen, swiping the probe's entry in the list of probes to the right and selecting End Cook.
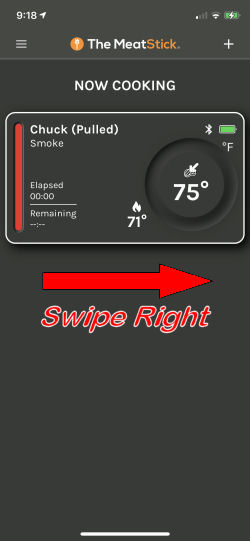 Step 1. Swipe right on the entry for the cook that you wish to end. |
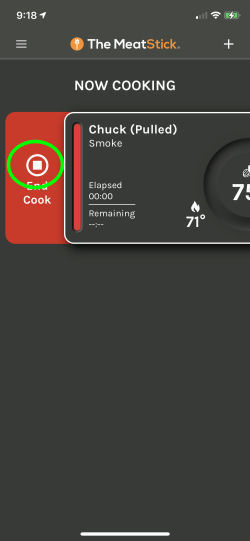 Step 2. The "End Cook" button will appear on the left. Click on the little square block. |
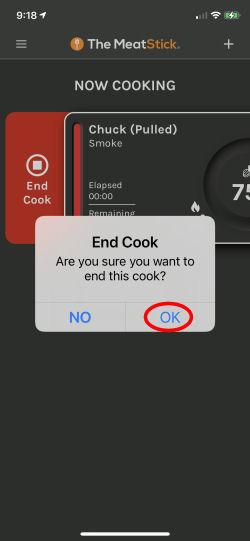 Step 3. Click "OK" on the popup that appears and you have ended the cook. |
Cooking Options
During the guided cooking process you are asked to specify the type of cook, the type of
meat you are cooking and the cut of meat. The App, in turn, will suggest cooking and
target temperatures for you and allow you to monitor the progress of the cook.
So, here are the options:
| Cooking Method | Type of Meat | Cut of Meat |
|---|---|---|
| Air Fryer | Beef | Prime Rib, Rib Eye Roast, Eye Round Roast, Round Tip Roast, Sirloin Tip, Rolled Rib, Rolled Rump |
| Poultry | Chicken, Cornish Hen, Duck, Chicken Breast, Turkey, Turkey Dumsticks, Turkey Thighs, Turkey Wings, Turkey Breast | |
| Pork | Center Loin Roast, Boneless Top Loin Roast, Blade Loin or Sirloin, Boston Butt | |
| Lamb | Rack of Lamb, Leg Roast, Rib Roast, Crown Roast, Shoulder Roast, Chop, Steak | |
| Seafood | Whole, Fillets, Steaks | |
| Plant-Based | Burger Patty, Sausages, Steaks | |
| Oven | Beef | Prime Rib, Rib Eye Roast, Eye Round Roast, Round Tip Roast, Sirloin Tip, Rolled Rib, Rolled Rump |
| Poultry | Chicken, Cornish Hen, Duck, Chicken Breast, Turkey, Turkey Dumsticks, Turkey Thighs, Turkey Wings, Turkey Breast | |
| Pork | Center Loin Roast, Boneless Top Loin Roast, Blade Loin or Sirloin, Boston Butt | |
| Lamb | Rack of Lamb, Leg Roast, Rib Roast, Crown Roast, Shoulder Roast, Chop, Steak | |
| Seafood | Whole, Fillets, Steaks | |
| Plant-Based | Burger Patty, Sausages, Steaks | |
| Stove | Beef | Ribeye, New York Strip, Flank Steak, Steak, Ribs (back), Burger Patty, Tenderloin |
| Poultry | Chicken Breast, Turkey breast, Turkey drumsticks, Burger Patty, Turkey thighs, Turkey wings, Duck breast | |
| Pork | Pork Chops, Loin (rib and shoulder), Burger Patty | |
| Lamb | Chop, Steak | |
| Seafood | Catfish, Fish (whole), Fish (Fillets), Salmon (Filet) | |
| Plant-Based | Burger Patty, Sausages, Steaks | |
| Grill | Beef | Steak, Flank Steak, Ribs, Tenderloin, Burger Patty |
| Poultry | Turkey Drumsticks, Chicken Breast, Chicken, Cornish Hen, Turkey Breast, Turkey Thighs, Turkey Wings, Duck, Burger Patty | |
| Pork | Pork Chops, Pork Loin, Burger Patty | |
| Lamb | Chop, Steak, Shoulder | |
| Seafood | Fillets, Whole, Steaks | |
| Plant-Based | Burger Patty, Sausages, Steaks | |
| Smoke | Beef | Spare Ribs, Brisket (Sliced), Brisket (Pulled), Short Ribs, Chuck (Sliced), Chuck (Pulled), Prime Rib, Whole Ribeye Loin, Beef Tenderloin, Tri-Tip, Steak |
| Poultry | Chicken Breast, WHole Chicken, Chicken Quarters, Turkey Breast, Cornish Hens, Whole Turkey, Turkey Leg, Whole Duck, Whole Goose | |
| Pork | Belly Bacon, Pork Butt (Sliced), Pork Butt (Pulled), Pork Chops, Ham, Pork Loin, Baby Back Ribs, Spare Ribs, Pork Tenderloin | |
| Lamb | Shoulder, Leg, Shank, Rack of Lamb, Chop, Steak | |
| Seafood | Catfish, Whole Fish, Fillets, Salmon Hot Smoked, Slammon Filet, Salmon Whole, Whole Trout, Lobster Tail | |
| Plant-Based | Burger Patty, Sausages, Steaks | |
| Sous Vide | Beef | Brisket, Chuck Roast, Prime Rib, Short Ribs, Whole Ribeye Loin, Rump Roast, Beef Tenderloin, Tri-Tip |
| Poultry | Chicken Breast, Chicken Quarters, Spatchcocked Chicken, Cornish Game Hens, Turkey Breast, Duck Breast, Goose Breast | |
| Pork | Pork Butt, Pork Chop, Ham (Bone In), Pork Loin, Baby Back Ribs, Pork Shoulder, Sliced, Pulled, Pork Tenderloin | |
| Lamb | Leg, Shank, Shoulder, Rack of Lamb | |
| Seafood | Catfish (Whole), Catfish (Fillet) Fish (Whole), Fish (Fillet), Salmon (Fillet), Whole Trout, Lobster Tail | |
| Plant-Based | Burger Patty, Sausages, Steaks | |
| Deep Fry | Poultry | Chicken Leg, Chicken Breast, Turkey Legs, Turkey Breast |
| Pork | Pork Cutlet, Pork Chops (bone in), Pork Loin (boneless) | |
| Seafood | Lobster tail, Fillet, Whole fish |
You will notice that not every cut of meat appears for every cooking method. For example, the Beef Eye of Round only appears under "Oven", but not under "Grill" or "Smoke". If you don't find the cut you want under the cooking method you have selected, you can look for it elsewhere as it won't make any difference since you can edit the cook if necessary.
You can support this website by shopping at The Naked Whiz Website Store and Amazon.com
|