Notes On Operating The Billows
A few things we'll point out about using the Billows controller:
- Try using the following startup procedure. (You will find the full Thermoworks recommendation in the Billows Operating Instructions):
- Close or block any inlet vents on your cooker not used by the Billows blower.
- Start with the exhaust vent(s) ⅛ of the way open. (You may need to adjust this as you see how your cooker behaves.)
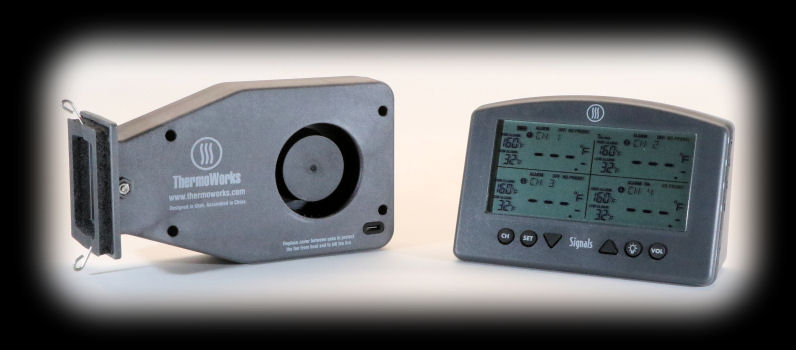
- Install the Billows unit with the air intake and USB-C port facing down.
- Install the pit probe by clipping it to the cooking grate about 1 inch from the food and near the center of your cooker.
- Load your cooker with charcoal and start the charcoal using your normal procedure for low and slow cooking.
- Let the cooker's temperature stabilize before making adjustments to the exhaust vent.
- If you have trouble getting your cooker hot, check your fuel levels. If it is getting too hot, make sure your cooker doesn't have any
air leaks and that the exhaust vents are sufficiently closed. (There is an ambient airflow through the blower even when it isn't running, so
you want to reduce that as much as possible.)
- When you are done cooking, Thermoworks recommends that you insert the yellow silicone plug into the
Billows intake to prevent hot air from the cooker from flowing back through the blower and damaging it.
- Keep the USB-C cables away from any hot surface on your cooker as they can be damaged by excessive heat.
- A frequently asked question about temperature controllers is whether or not you should leave the adapter installed all the time and if so, how do you
control air flow when you aren't using the unit. In the case of the Billows, you probably don't want to leave the blower installed all the time.
Installing it on your cooker is relatively simple, as is removing it.
- Placement of the pit probe can be important. There are two schools of thought. One is that you want it located near the meat so that the controller is
controlling the temperature at the location of the meat, not somewhere else. However, the probe must not touch the meat and should be at least an inch or
two from the meat. If the meat influences the temperature of the probe (especially when the meat is first placed in the cooker and is cold), obviously
the controller will be sensing a false pit temperature and will therefore compensate to the detriment of the desired results. The other school of
thought is that if you are used to cooking by dome temperature (meaning as measured by the thermometer sticking through your dome), then you may wish to
place the pit probe on the stem of your thermometer to control the temperature measured at that location. In the case of the Signals unit, the air
probe provided only has a grate clip, so you can't really afix it to the stem of your dome thermometer.
- The Signals unit doesn't know or care what type of probe you have plugged into Channel 4 as long as there is indeed a probe plugged in. You
can probably use any Pro-Series probe for your pit probe as long as it is appropriately placed in your cooker.
- The default is for Signals to update the temperature readings once every 60 seconds. You will probably want to
go in and change that to a lower value. We used the minimum value of 10 seconds for data collection purposes.
- The printed instructions that come with the Billows unit are somewhat meager. There is a QR code provided for
a link to an article on the Thermoworks Help Center that provides more information.
- Either the App or the Signals unit appears to have bugs relating to the alarm settings. One time we found that
the high and low alarms for one of the channels had changed to some bizarre values all by themselves. Also, when you use channel 4 to control
the Billows fan, the alarms are supposed to hard-coded to 25°F above and below your target temperature. At
the beginning of one test with a target temperature of 225°F, the alarms were set to 245°F and 250°F.
Of course, you cannot manually override these values, but later in the test, the low alarm magically corrected
itself. During another test with a target temperature of 325°F, the low alarm was incorrectly set to 175°F
and again magically corrected itself at some point.
- You do not need to be connected to WiFi or use your smart device to use the Signals/Billows combination. You
have access to all the basic functions needed to use the Billows blower on the Signals unit.
Billows Control Results
How well does the Billows/Signals combination actually control the temperature of your cooker?
Here are the results that we obtained when allowing the Billows to control a large Big Green Egg at low, medium and
high temperatures:
| Target |
Accuracy |
Swing |
|---|
| Low |
+8.8° F |
±12.3° F |
| Medium |
+4.4° F |
±7.4° F |
| High |
+1.1° F |
±4.3° F |
|
|
Billows Results
|
As you can see, the Billows results are perfectly acceptable for the purpose of cooking BBQ. However, these are also some
of the worst results we have seen among all the different brands and models we have tested over the years.
For comparison, the following graphs show a roughly 7-hour burn at 350 degrees using a Flame Boss 300 controller, a SMOBOT
controller, and the Billows controller:
 7-hour burn using the Flame Boss 300 controller at 350°F

7-hour burn using the SMOBOT controller at 350°F

7-hour burn using the Billows controller at 350°F
As you can see, the Flame Boss 300 and SMOBOT controllers keep the temperature pretty close to the target all the
way from start to finish. The Billows unit starts out looking pretty good, but then it starts oscillating for a
period. Then it really starts to jump up and down for a while until it settles back down. And in the chart below
you can see that at a lower temperature of 225°F, the wild oscillations go on for several hours before settling
down to a more reasonable range of temperatures.

7-hour burn using the Billows controller at 225°F
It appears that the 46CFM blower is just overpowered for low temperature cooking on efficient kamado-style
cookers, and this is why a damper on the blower would have been a useful feature.
Again, these results are acceptable for cooking barbecue, for the most part, but it is the worst performance we have seen in
a temperature controller.
Summary
The Thermoworks Billows/Signals combination at first look appears to be a rather inviting option for a BBQ
temperature controller. However, once you consider the missing function/features and the poor temperature
control, it isn't such an easy decision after all. Here is a list of Pro's and Con's:
| Pros:
Price. Less expensive that similarly equipped Flame Boss, Fireboard or CyberQ Cloud.
More expensive than PitmasterIQ 130 or Auber Instruments. Especially attractive if you
already happen to own a Signals unit.
46 CFM blower should be powerful enough for any cooker.
Probes are less expensive than other brands of controllers.
Thermoworks devices are high quality, backed by first class customer support.
|
Cons:
No Open Lid Detect feature.
No Ramp Mode or Keep Warm feature.
Worst in class temperature control.
46 CFM blower appears to be overpowered for many cookers since there is no damper.
No battery option available from Thermoworks.
Grate probe must be clipped to the grid since there is no alligator clip type probe available.
No visible indication that the blower is running.
Graphing functions are relatively primitive.
|
The Billows/Signals combination is probably a no brainer for anyone who already owns a Signals unit. You have an
outstanding BBQ Thermometer with four temperature probes already, and for a mere $59 you can add the temperature
control function provided by the Billows blower.
However,
if you don't already own a Signals unit and are starting from scratch, you should look at the additional features that are
available on other brands, as well as the more precise control available, and then decide whether the Billows/Signals combination
or other brands better suit your needs.
Contact Information
Web: www.thermoworks.com
Facebook: https://www.facebook.com/ThermoWorks-141229422561526/
|