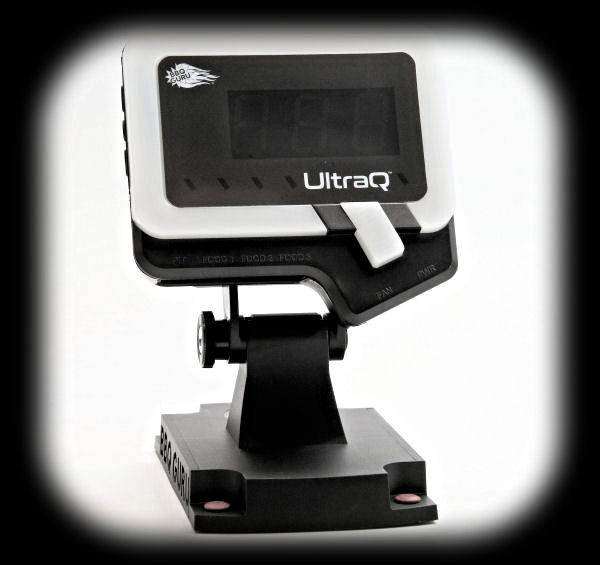
The Display
The temperature display is a 3-digit seven-segment LED display, 13/16" x 2⅛" / 21mm x 54mm.
However, the total display is much more, consisting of several colored LEDs, a light ring and what is
called a tail. Here we have labelled the components of the display for you:
| 1 - The top and bottom bars create the top and bottom of the light ring.
2 - The left and right bars create the sides of the light ring.
3 - The tail shows the color of the currently displayed temperature probe.
4 - The four colored LEDs (red, yellow, green, blue) indicate if each temperature
probe is inserted or not (on or off).
|
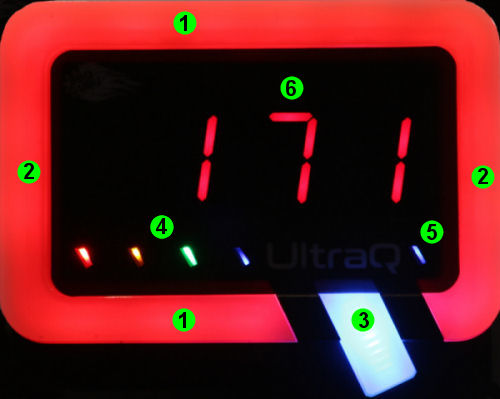 |
5 - This LED flashes blue if there is no Bluetooth connection, and is solid
blue if there is a Bluetooth connection. If you have set the unit up for Wi-Fi and
have a Wi-Fi connection and a Bluetooth connection, this LED will be solid purple.
If you only have a Wi-Fi connection, it will flash between red and purple.
6 - There are 3 seven-segment LED digits that make up the temperature display itself. |
Let us show you the various ways that the light ring is used to communicate information:
| No Pit Probe 
If there is no pit probe installed, the entire light ring will flash red to alert you.
|
Scrolling Pit Temperatures 
You can instruct the unit to scroll through the various temperature probes. The tail will change colors
to match the color of the probe it is currently displaying.
|
| Blower On Outside Target Range 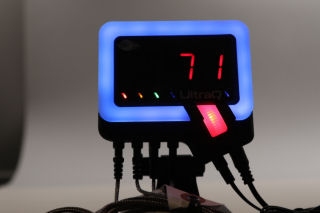
If the pit temperature is below the target range and the blower is running, the entire ring will illuminate solid blue.
|
Blower Off Inside Target Range 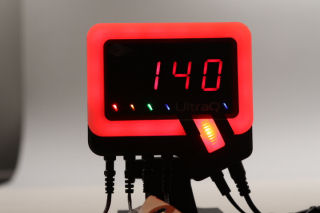
When the pit temperature is within a certain number of degrees of the target ("inside the target range"), the ring will turn red. If the
blower is not running, the entire ring will be on solid.
|
| Blower On Inside Target Range 
When the pit temperature is within the target range AND the blower is pulsing, the
entire ring will be red, but the sides will flash.
|
Pit Temperature Too High 
When the pit temperature rises too far above the target temperature, the display will flash "Hi" and the entire
ring will flash red. (An audible alarm also sounds.)
|
While you may find the light ring useful for at-a-glance status, you will find that in bright sunlight, you can barely see the
color of the ring. Otherwise, the light ring and tail are a clever way to relay information about the state of the cooks.
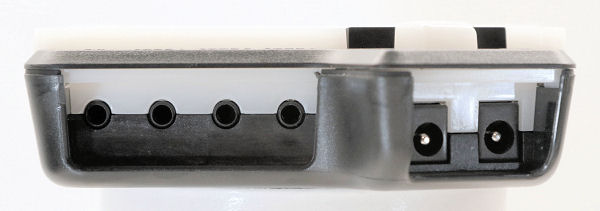
Connections
All the connections are on the bottom edge of the UltraQ unit. From left to right are the plugs
for the pit probe, the three food probes, the blower and the power cord. They are labeled on
the front of the unit.
The Reset Button
There is no reset button on the UltraQ. You can do a factory reset from the BBQ Guru App, however.
Power
The UltraQ unit is powered by 12V DC. It comes with a power adapter that can be used with 100-240 VAC, 50-60 Hz.
The power adapter has a 5-foot cord. Since the unit has a standard 5.5mm/2.5mm 12V barrel socket on it, you can
use an automobile jump start battery with a cigarette plug to power the unit.
It is important to note that for the first time, the power supply comes with a separate power cord that must be
attached to the power supply via a plug with screw ring. While the plug is keyed, it is possible to insert the
plug incorrectly far enough to make contact with the power supply and damage the power supply. Be careful when
you install the cord to be sure that you get the plug inserted correctly. It is a good idea to make sure that the
power cord is not plugged in while you attach it to the power supply in order to avoid an accidental mismatch that
would damage the power supply.
You can see the plug incorrectly inserted in the photo on the left below. The middle photo shows the plug inserted
correctly while the photo on the right shows the screw ring tightened and holding the plug in place.
Temperature Probes
The UltraQ comes with one pit temperature probe and one food temperature probe, although it will support up to three food probes. (Additional
probes are available from BBQ Guru.) The probes which come with the UltraQ are new and improved over previous probes sold by
BBQ Guru as these new probes are now dishwasher safe.
|
|
|
Thermocouples: Type T vs K
Type K thermocouples are the most common type of thermocouple. They are inexpensive, accurate, reliable, and have a wide temperature range.
They are made from Nickel-Chromium / Nickel-Alumel and
have a range of -454°F to +2,300°F and an accuracy of ±4°F or ±0.75%,
whichever is greater.
Type T thermocouples are very stable and often
found in laboratory environments. They are made from Copper / Constantan
and have a smaller range of -454°F to +700°F, but greater accuracy of
±2.0°F or ±0.75%, whichever is greater. |
The probes are made from stainless steel and each probe contains a type T thermocouple, a more accurate type of thermocouple than you usually see.
(See sidebar). Each probe has a 72" braided stainless steel
cable and can handle up to 500°F (260°C). An alligator clip is provided with the pit probe which you can use to clip the probe to your food grid
or the stem of your dome thermometer. (Cooks debate which location is better. Presumably, placing the pit probe on the grate near the food will measure the
air temperature where the food is cooking. On the other hand, if you are used to cooking by dome temperature, placing the pit probe on the stem of the dome
thermometer will allow you to continue cooking the way you always have.)
The probes and the wires should be shielded from direct radiation from a hot fire. Do not let them come into direct contact with flames.
If you need to shield the wire, you can place a layer of aluminum foil beneath it. Also, having the pit probe itself exposed to direct
radiant heat can cause it to register a temperature which is higher than the air temperature in the cooker, and thus fool the controller
into cutting back on the fire.
Temperature Probe Accuracy
|
|
|
Why The Need For A Warmup?
The way thermocouples work is you measure the voltage generated across the thermocouple
and this tells you the DIFFERENCE in temperature between the probe end of the thermocouple
and the plug end. To determine the actual temperature at the probe end, you
need to know the temperature of the plug end of the wire. Then you can add the temperature at the
plug end to the temperature difference and you have the temperature of the probe end.
Finding the temperature of the plug end is done by having a thermistor inside the unit. Normally, the inside of the unit
is the same temperature as the plugs just outside the unit and you can determine the probe
temperature immediately. But with the UltraQ, the
LEDs are generating heat and raising the temperature inside the unit. Until the
temperature inside the unit stabilizes, you don't have a stable temperature from
the thermistor to use in calculating an accurate temperature for the probe. |
First, we need to mention a behavior of the UltraQ which is new to us when it comes to barbecue temperature
controllers. You need to let the unit "warm up" for 5-10 minutes before the probes will give accurate readings.
So, when testing your probes or even simply using the UltraQ to control your cooker, allow 5-10 minutes for the
unit to warm up. Yes, we can hear you saying no other unit has ever required a warmup period. That's because no
other units contain such a large number of LEDs inside the unit which generate enough heat to raise the temperature
inside the unit. For an more detailed explanation, see the sidebar at right.
That said, we measured the temperature of boiling water using the UltraQ controller.
Using our boiling point calculator to determine the boiling point of
water in our locaton (211.6°F),
we then measured the temperature of boiling water with each of the probes:
| Probe |
Room Temperature |
Boiling Water |
|---|
| Actual |
73.2°F |
211.6°F |
| Food 1 |
73.0°F |
212.0°F |
| Pit Probe |
73.0°F |
212.0°F |
As you can see, both probes registered the same temperature at room temperature, and both were spot on.
As you can also see, both probes registered the same temperature of boiling water, but were about 0.5°F high
compared to the actual boiling point of water. So, both probes were within the error limit for a Type T thermocouple,
and exhibit more than enough accuracy to control the temperature of a cooker. And compared to the 50°F
swing that is typical of most kitchen ovens, these results are phenomenal. Here is how well our $2200 Bosch oven
holds 300°F:
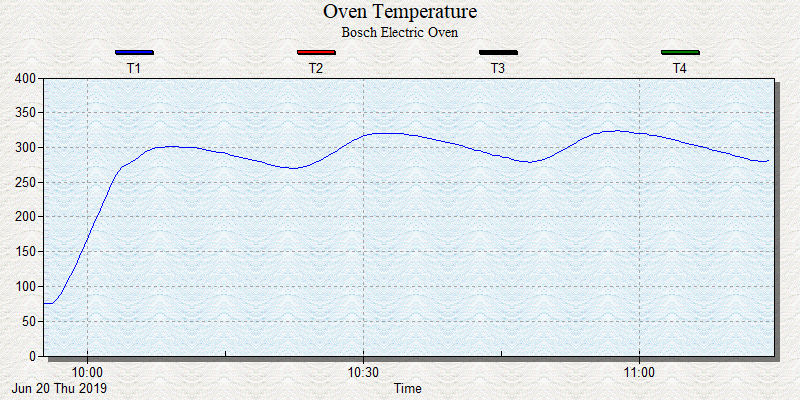
That's a 43°F swing on the last oscillation. Again, an error of a few degrees on your pit temp is irrelevant.
Calibration
The temperature probes cannot be calibrated, or more correctly, the UltraQ controller cannot be calibrated by the user.
If your probes all consistently read off by a significant amount, you should contact BBQ Guru support to consider
having them take a look.
|